앱 개발이 마무리 되가서 ci/cd를 해야한다.
gitlab ci를 현재 사용중이므로 이걸 이용하기로 한다.
기존 프로젝트는 main/dev 브랜치에 머지 시점에 빌드 트리거를 작동햇는데 앱 빌드는 수동으로 클릭해서 사용해야한다.
일단 gitlab 서버는 설치되있다고 가정하고 gitlab runner를 설치해보자.
이제 이걸 gitlab runner가 실행해주면된다.
gitlab-runner
install gitlab-runner
on macos
sudo curl --output /usr/local/bin/gitlab-runner https://gitlab-runner-downloads.s3.amazonaws.com/latest/binaries/gitlab-runner-darwin-amd64
sudo chmod +x /usr/local/bin/gitlab-runner
cd ~
gitlab-runner install
gitlab-runner start
register gitlab runner on macbook
sudo gitlab-runner register
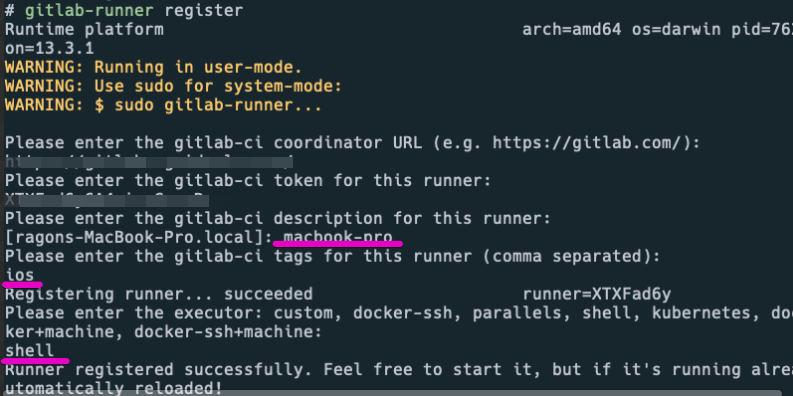
gitlab에서 admin > runner 에 가면 token 토큰을 찾을수 있다.
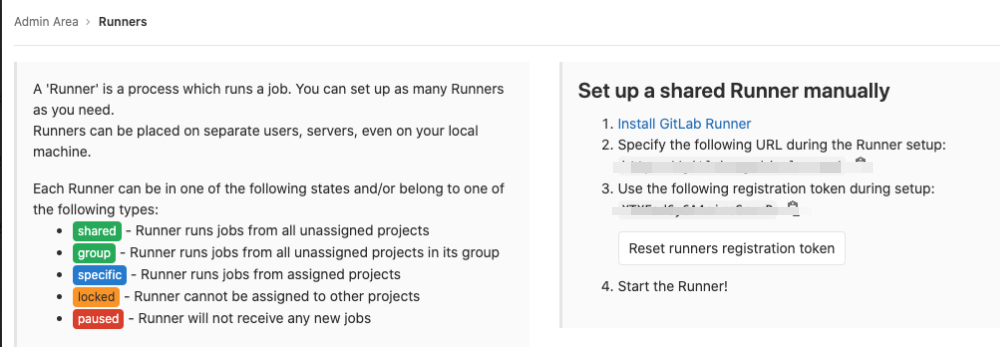
gitlab 웹사이트에서 runner에 가서 등록이 됫는지 확인한다.

추가 완료
러너를 눌러보면 restrict project for this runner라는 곳이 잇는데 여기에서 맥에서 빌드되야하는것만 선택한다.
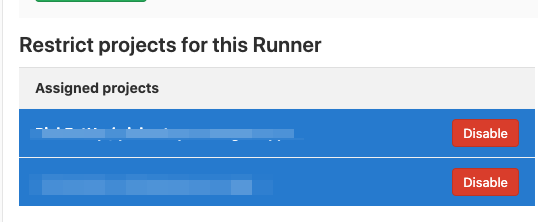

specific 이라고 되면 성공
프로젝트에 가서 러너를 체크해보자.
project » setting » ci/cd »
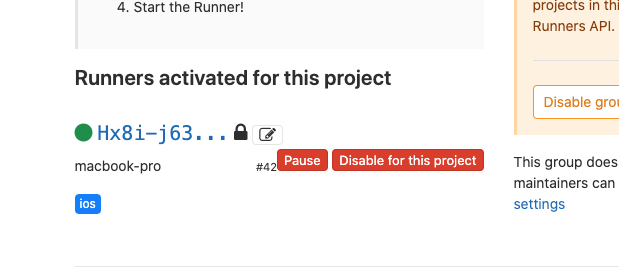
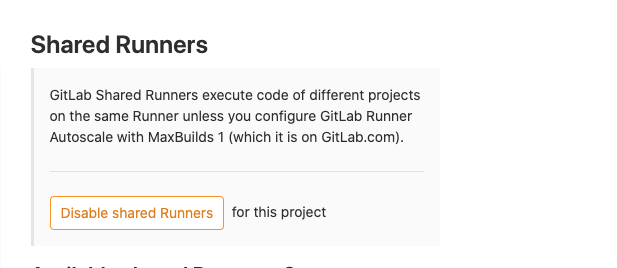
나는 특정 프로젝트만 (ios빌드용) 사용할 예정이라 shared runner가 enable되잇으면 disable하자.
완료
위처럼 수동으로 할수도 있고 자동화 스크립트로 처리 가능
gitlab-runner register \
 --non-interactive \
 --executor "shell" \
 --url "https://gitlab.your-domain.com/" \
 --registration-token "6y6A4circGrvrR" \
 --description "macbook-pro" \
 --tag-list "ios" \
 --run-untagged="true" \
 --locked="true"
참고로 설정은 ~/.gitlab-runner/config.toml 에 저장된다.
gitlab-runner service start
gitlab-runner start
이제 빌드를 해보자.
vi .gitlab-ci.yml
stages:
  - build

build-dev:
  stage: build
  script:
    - echo "hello"
이제 커밋해보자. 푸시
자동으로 빌드가 시작되는지 확인해보자.

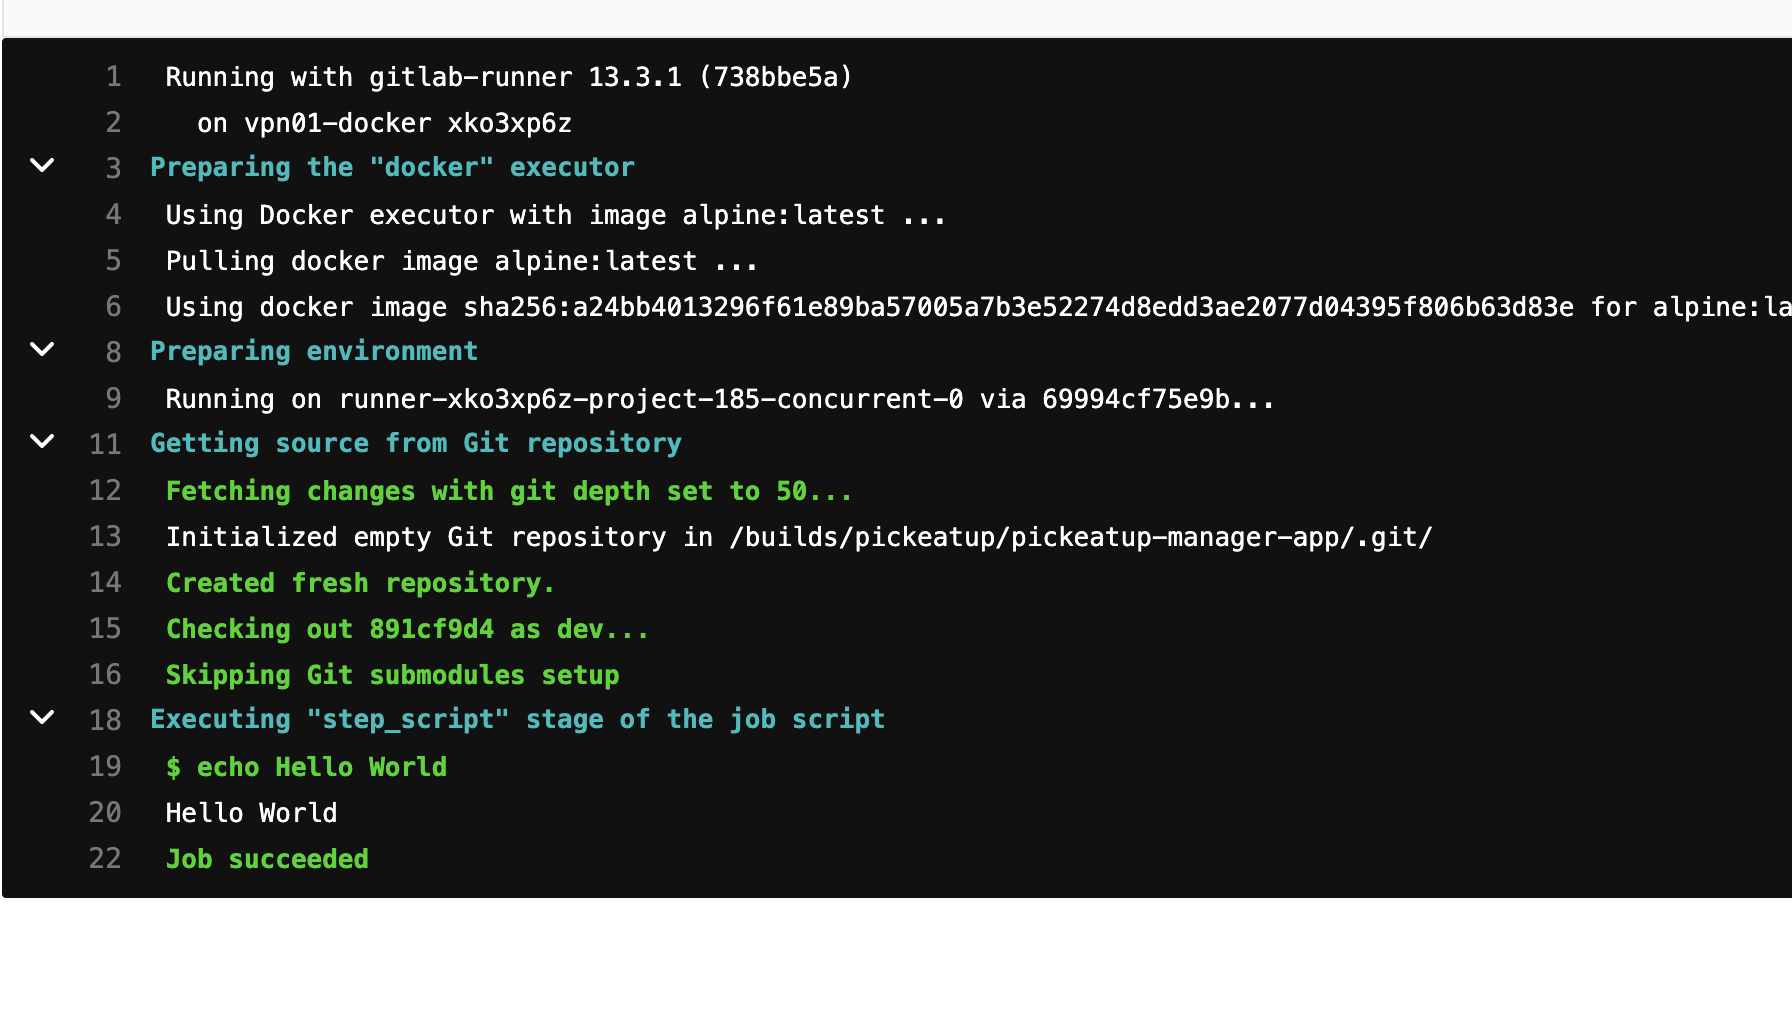
잘 빌드된다.
추가로 작업이 필요하면 스크립트를 만들어서 .gitlab-ci.yml에 추가하면 빌드가 되겟다.
log 확인
application » util » console : filter by gitlab
로그가 보이면서 에러내용도 볼수 있다.
xcode build with command line
xcode에서 archive메뉴를 이용하면 업로드까지 모두 처리가 된다. 그러나 우리는 커맨드라인으로 처리를 해야한다. 그래야 gitlab runner가 실행해줄수 있다.
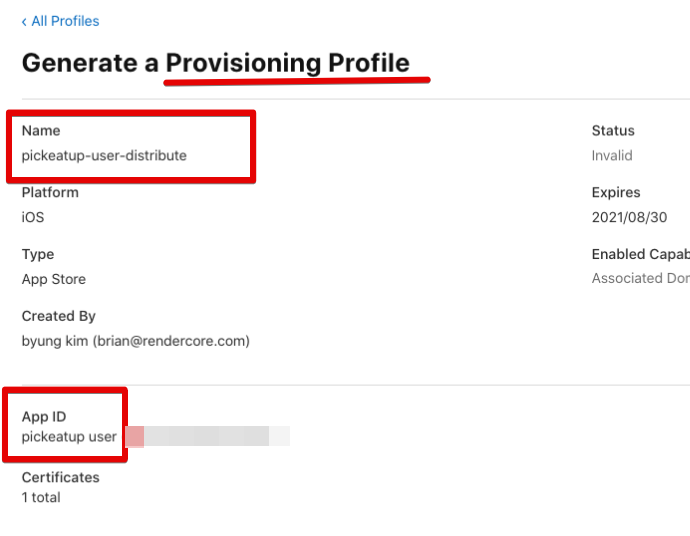
ExportOptions.plist 파일을 만들어야한다.
<?xml version="1.0" encoding="UTF-8"?>
<!DOCTYPE plist PUBLIC "-//Apple//DTD PLIST 1.0//EN" "http://www.apple.com/DTDs/PropertyList-1.0.dtd">
<plist version="1.0">
<dict>
  <key>method</key>
  <string>app-store</string>

  <key>teamID</key>
  <string>YOUR TEAMID</string>

  <key>signingCertificate</key>
  <string>YOUR CERT</string>

  <key>provisioningProfiles</key>
  <dict>
    <key>YOUR APP ID</key>
    <string>YOUR PROFILE NAME</string>
  </dict>

  <key>destination</key>
  <string>upload</string>
</dict>
</plist>
method로 app-store를 쓰겟다는것이고(ad hoc등을 사용할수도 있다)
teamid
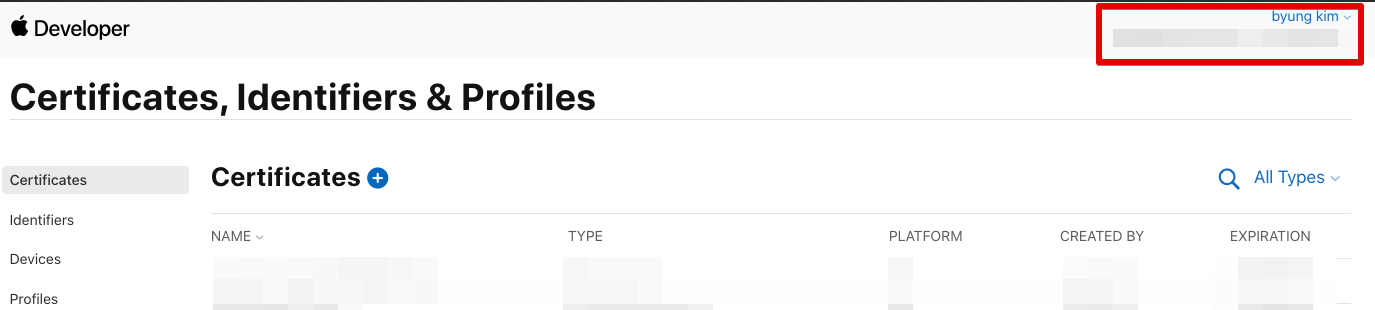
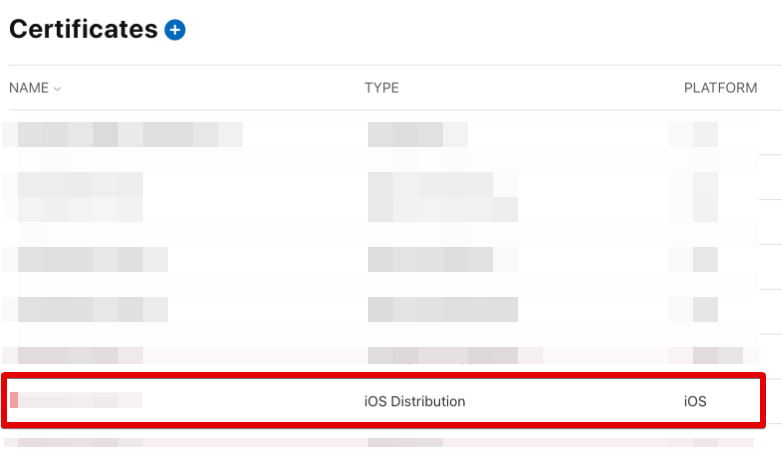
certification ( apple distribute용 하나면 다 됨. )
profile
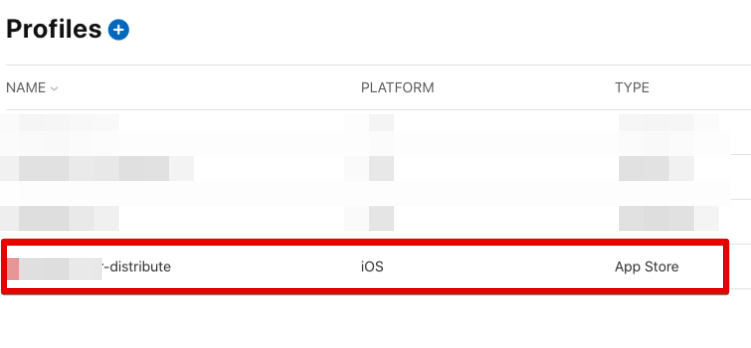
꼭 App store type으로 만들어서 그걸 이용하자.
이제 macos에서 빌드하고 업로드해보자.
npm install
ionic build --configuration=production && npx cap copy ios && npx cap update ios
cd ./ios
xcodebuild -workspace 'App/App.xcworkspace' -scheme 'App' -configuration 'Release' -archivePath tmp.xcarchive archive # build and archive
xcodebuild -exportArchive -archivePath ./tmp.xcarchive -exportOptionsPlist ./ExportOptions.plist -exportPath ./exportIpaArchive/ # upload
이제 이 스크립트를 gitlab runner가 실행할수 있게 해주면 된다.
stages:
  - build

build-staging:
  stage: build

  script:
    # nvm을 사용하지 않는 사람은 필요없음.
    # - source ~/.nvm/nvm.sh
    # - nvm use v12.16.1
    - npm install
    - ionic build --configuration=production && npx cap copy ios && npx cap update ios
    - cd ./ios
    - xcodebuild -workspace 'App/App.xcworkspace' -scheme 'App' -configuration 'Release' -archivePath tmp.xcarchive archive
    - xcodebuild -exportArchive -archivePath ./tmp.xcarchive -exportOptionsPlist ./ExportOptions.plist -exportPath ./exportIpaArchive/
commit & push 하면 gitlab ci/cd가 동작한다.
파일이 test flight에 업로드 된다. 이걸 https://appstoreconnect.apple.com/ 웹사이트를 통해서 퍼블리시 하면 된다.
ci/cd trigger
master일때만 ci/cd를 실행
stages:
  - build

build-staging:
  stage: build

  script:
    - source ~/.nvm/nvm.sh
    - nvm use v12.16.1
    - npm install
    - ionic build --configuration=production && npx cap copy ios && npx cap update ios
    - cd ./ios
    - xcodebuild -workspace 'App/App.xcworkspace' -scheme 'App' -configuration 'Release' -archivePath tmp.xcarchive archive
    - xcodebuild -exportArchive -archivePath ./tmp.xcarchive -exportOptionsPlist ./ExportOptions.plist -exportPath ./exportIpaArchive/
  only:
    - master
마스터일때만 빌드를 시작하고 업로드한다.
특정 태그일때만 ci/cd를 실행하고싶다.
생각해보니 마스터일때만 할게 아니라 버전을 태깅을 하면 그때 동작하게 하고 싶다.
yml에 tags를 추가한다.
stages:
  - build

build-staging:
  stage: build
  script:
    - source ~/.nvm/nvm.sh
    - nvm use v12.16.1
    - npm install
    - ionic build --configuration=production && npx cap copy ios && npx cap update ios
    - cd ./ios
    - xcodebuild -workspace 'App/App.xcworkspace' -scheme 'App' -configuration 'Release' -archivePath tmp.xcarchive archive
    - xcodebuild -exportArchive -archivePath ./tmp.xcarchive -exportOptionsPlist ./ExportOptions.plist -exportPath ./exportIpaArchive/
  only:
    - tags
이제 commit / push를 하고 난후 tagging을 한다.
git tag -m "release v1.0.0" -a v1.0.0 05d9873 # git hash
git push origin v1.0.0                        # push tags
1.0.0 태깅을 하면 ci/cd가 트리거 된다.
버전 업데이트
MARKETING_VERSION 과 CURRENT_PROJECT_VERSION을 업데이트 해야한다.
package.json에 잇는 버전을 읽어와서 MARKETING_VERSION 변수로 만들어 두고 agvtool 라는 툴을 이용해서 업데이트를 할수가 있다.
CURRENT_PROJECT_VERSION은 다음 번호를 넣게 해서 사용한다.
- export MARKETING_VERSION=$(node -p -e "require('./package.json').version")
- echo $MARKETING_VERSION
- cd ./ios/App
- xcrun agvtool new-marketing-version $MARKETING_VERSION
- xcrun agvtool next-version -all
- ionic build --configuration=production && npx cap copy ios && npx cap update ios
- cd ../
- xcodebuild -workspace 'App/App.xcworkspace' -scheme 'App' -configuration 'Release' -archivePath tmp.xcarchive archive
- xcodebuild -exportArchive -archivePath ./tmp.xcarchive -exportOptionsPlist ./ExportOptions.plist -exportPath ./exportIpaArchive/
CURRENT_PROJECT_VERSION는 다음번을 넣어주기는하는데 기본값을 기준으로해서 문제가 된다.
예를 들면 기존값이 5면 빌드시 6으로 만들어 주기는 하나 여전히 소스코드는 5로 되잇기때문에 새로 받아서 빌드하면 또 6이 생성될듯 보인다.
바뀐값이 소스코드에 포함이 되야하는데 음.
바뀐값을 커밋해줄가? 그럼 계속 빌드가 되는 문제가 생기는데
tags가 잇는경우만 빌드가 트리거가 되게 바꾸면 바뀐값을 커밋해도 되겟다.
commit / push가 어느 브랜치로 될가?
테스트해보니 문제가 있음 gitlab runner는 기본적으로 https를 통해서 git clone을 받는다. https는 커밋이 안된다. ssh를 사용해야하는데
해보자.
stages:
  - build

variables:
  GIT_STRATEGY: none

build-staging:
  stage: build

  before_script:
    ## clean the working directory
    - BUILD_DIR=~/builds/
    - rm -rf $BUILD_DIR
    - mkdir -p $BUILD_DIR
    - cd $BUILD_DIR
    ## clone
    - git clone ssh://git@gitlab.xgridcolo.com:30022/pickeatup/pickeatup-manager-app.git .

  script:
    ## nvm사용하면
    ## - source ~/.nvm/nvm.sh
    ## - nvm use v12.18.4
    - npm install
    - ionic build --configuration=production && npx cap copy ios && npx cap update ios
    - export MARKETING_VERSION=$(node -p -e "require('./package.json').version") ## package.json에 버전을 가지고 와서 marketing_version에 사용한다.
    - cd $BUILD_DIR/ios/App
    - xcrun agvtool new-marketing-version $MARKETING_VERSION
    - xcrun agvtool next-version -all
    - git commit -am next-version # 바뀐값 커밋
    - git push origin HEAD:dev # push to origin
    - cd $BUILD_DIR/ios
    - xcodebuild -workspace 'App/App.xcworkspace' -scheme 'App' -configuration 'Release' -archivePath tmp.xcarchive archive
    - xcodebuild -exportArchive -archivePath ./tmp.xcarchive -exportOptionsPlist ./ExportOptions.plist -exportPath ./exportIpaArchive/

  only:
    - tags
GIT_STRATEGY: none 이라는것이 자동으로 clone을 가져오지 않게 한다.
이제 스크립트에서 클론을 받아보고 그걸 빌드하면된다.
그리고 바뀐값을 이제 커밋하면 된다.
빌드하고 숫자가 바뀐걸 커밋해준다. 이제 잘 된다.
이제부터는 tagging을 하면 빌드가 트리거 된다.
known error
gitlab runner stuck
혹시 gitlab runner가 stuck상태이면 runner 상태를 보자.
admin » runner » 특정 러너 수정
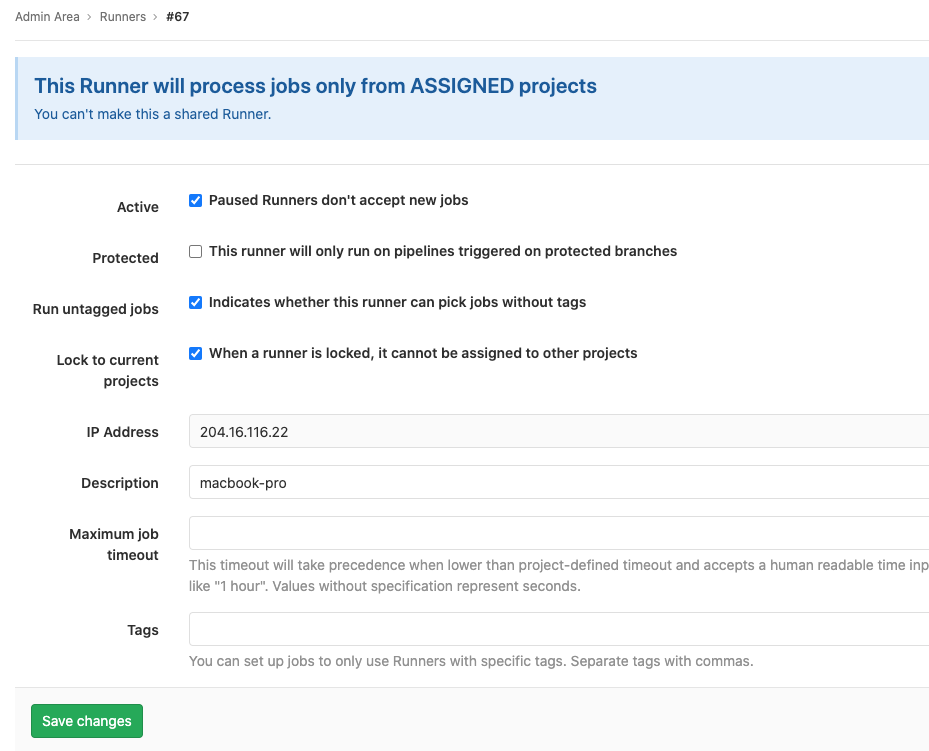
indicate whether this runner can pick jobs without tags => on
아래쪽 tags는 빈칸