nginx-01
nginx가 쓸일이 있어서 공부한것을 정리해보았다.
docker로 실습 준비
이것저것 해보기 위해서 랩을 만들어야햇다.
cd ~/Desktop
mkdir nginx
cd nginx
touch default.conf
touch docker-compose.yml
cat default.conf
server {
    listen       80;
    server_name  localhost;

    location / {
        root   /usr/share/nginx/html;
        index  index.html index.htm;
    }

    error_page   500 502 503 504  /50x.html;
    location = /50x.html {
        root   /usr/share/nginx/html;
    }
}
cat docker-compose.yml
web:
  image: nginx
  volumes:
    - ./default.conf:/etc/nginx/conf.d/default.conf
  ports:
    - '80:80'
이제 실행해보자.
docker-compose up -d

Creating nginx_web_1 ... done

docker ps

CONTAINER ID   IMAGE     COMMAND                  CREATED         STATUS         PORTS                NAMES
c2724855d0ad   nginx     "/docker-entrypoint.…"   4 seconds ago   Up 2 seconds   0.0.0.0:80->80/tcp   nginx_web_1
http://localhost/ 로 확인해보자.
사이트가 떴다.
이제부터 conf를 바꿔가며 도커를 재시작하면서 테스트하면 된다.
test-nginx.com 으로 도메인 변경
지금은 localhost로 되있다. test-nginx.com으로 변경해보자.
hosts파일 설정
간단하게 /etc/hosts파일 변경으로 도메인을 이용하려고 한다. 사용하는 도메인은 test-nginx.com
vi /etc/hosts
127.0.0.1 test-nginx.com
default.conf 변경
server {
  ...
  server_name  test-nginx.com; # 여기 변경
  ...
}
docker-compose down
docker-compose up -d
이 내용을 추가하고 웹브라우저로 http://test-nginx.com을 확인한다.
URL에 www가 포함되어 있으면 이것을 제거한 URL로 영구(permanent) 이동
if ($host ~* ^www\.(.*)){
    set $host_without_www $1;
    rewrite ^/(.*)$ $scheme://$host_without_www/$1 permanent;
}
http://www.test-nginx.com/ 을 확인해보자.
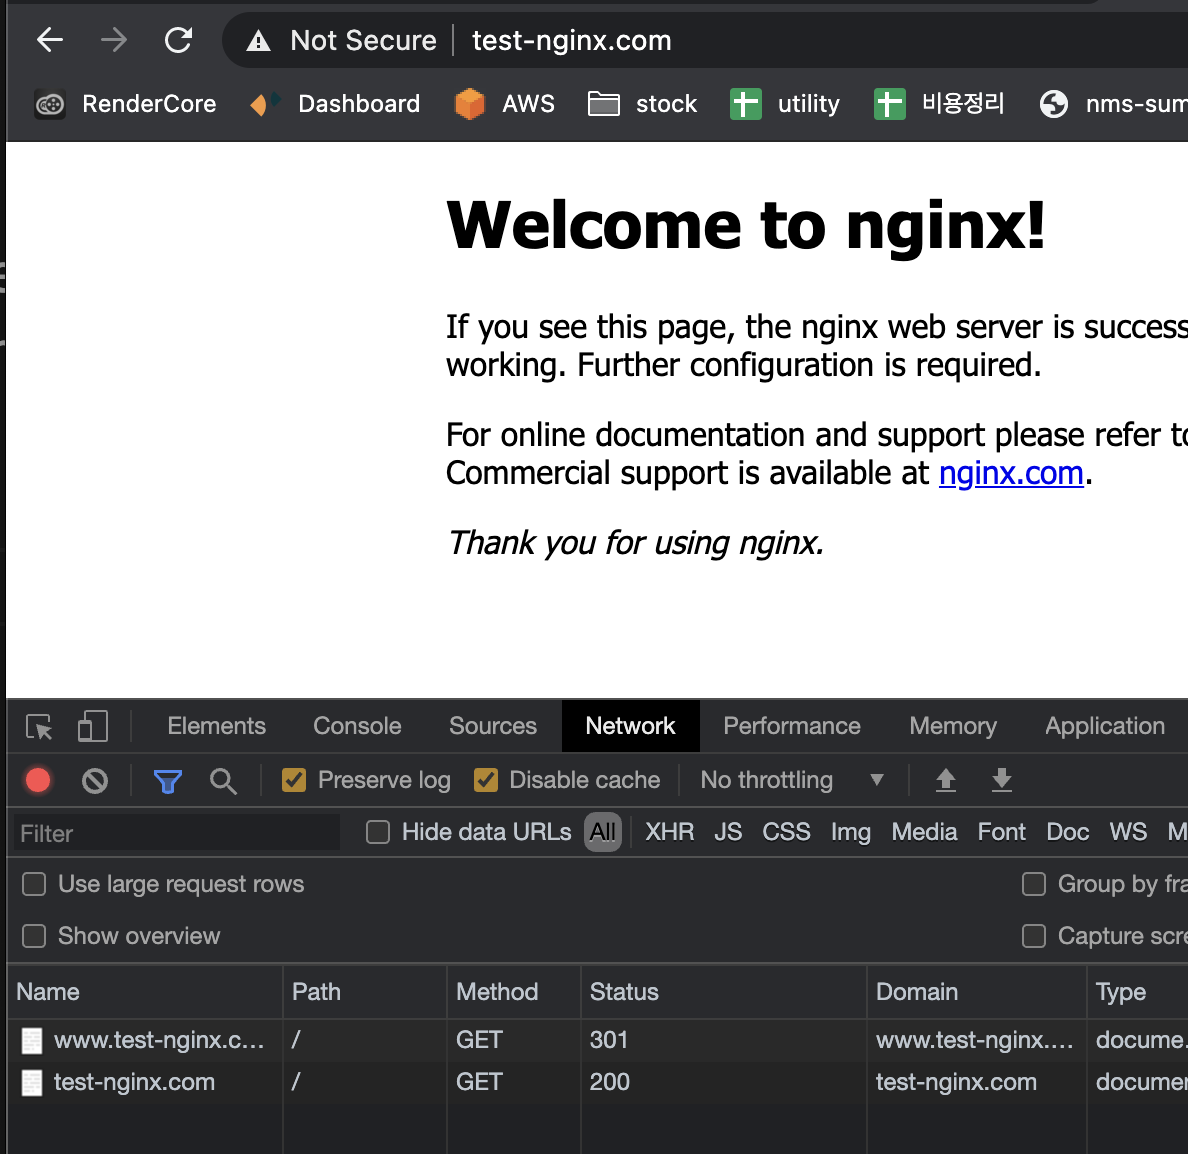
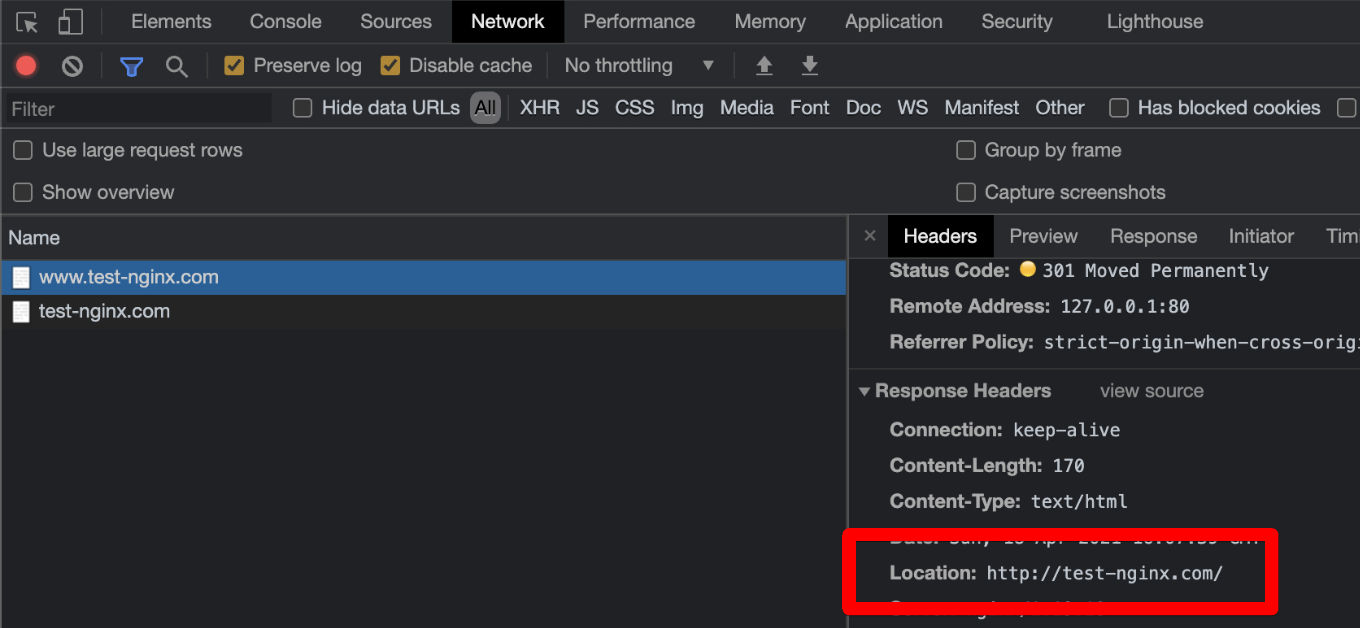
이미지를 보면 알겠지만 브라우저가 301을 먼저 받는다. 거기에 location값에 www가 제거된 값을 받는다.
브라우저는 301을 받으면 무조건 location값으로 요청을 한번 더 한다. 자동으로
결과적으로 www가 없는 test-nginx.com에 요청이 가게 되고 브라우저에 내용이 보여지게 된다.
if 설명
위에보면 if로 처리하는것을 볼수가 있다. 설명을 해보면
- a variable name: 변수값이 empty나 0 은 false로 간주
- string: “=” and “!=” operators를 사용;
- 파일 존재: “-f” and “!-f” operators를 사용;
- 디렉토리 존재:
-dand!-doperators를 사용; - file, directory, or symbolic link 존재: the
-eand!-eoperators를 사용; - executable file: the
-xand!-xoperators를 사용. - 정규식:
~(대소문자 구분) and~*(대소문자 비구분) operators를 사용. - Regular expressions can contain captures that are made available for later reuse in the $1..$9 variables.
- 정규식 Negative operators:
!~and!~*are also available. - 정규식이
}or;characters를 가지고 있으면 전체 문장은 single or double quotes로 감싸여야한다.
위 예제를 보면 ^www\.(.*) 를 정규식으로 사용한다.
확인해보자.
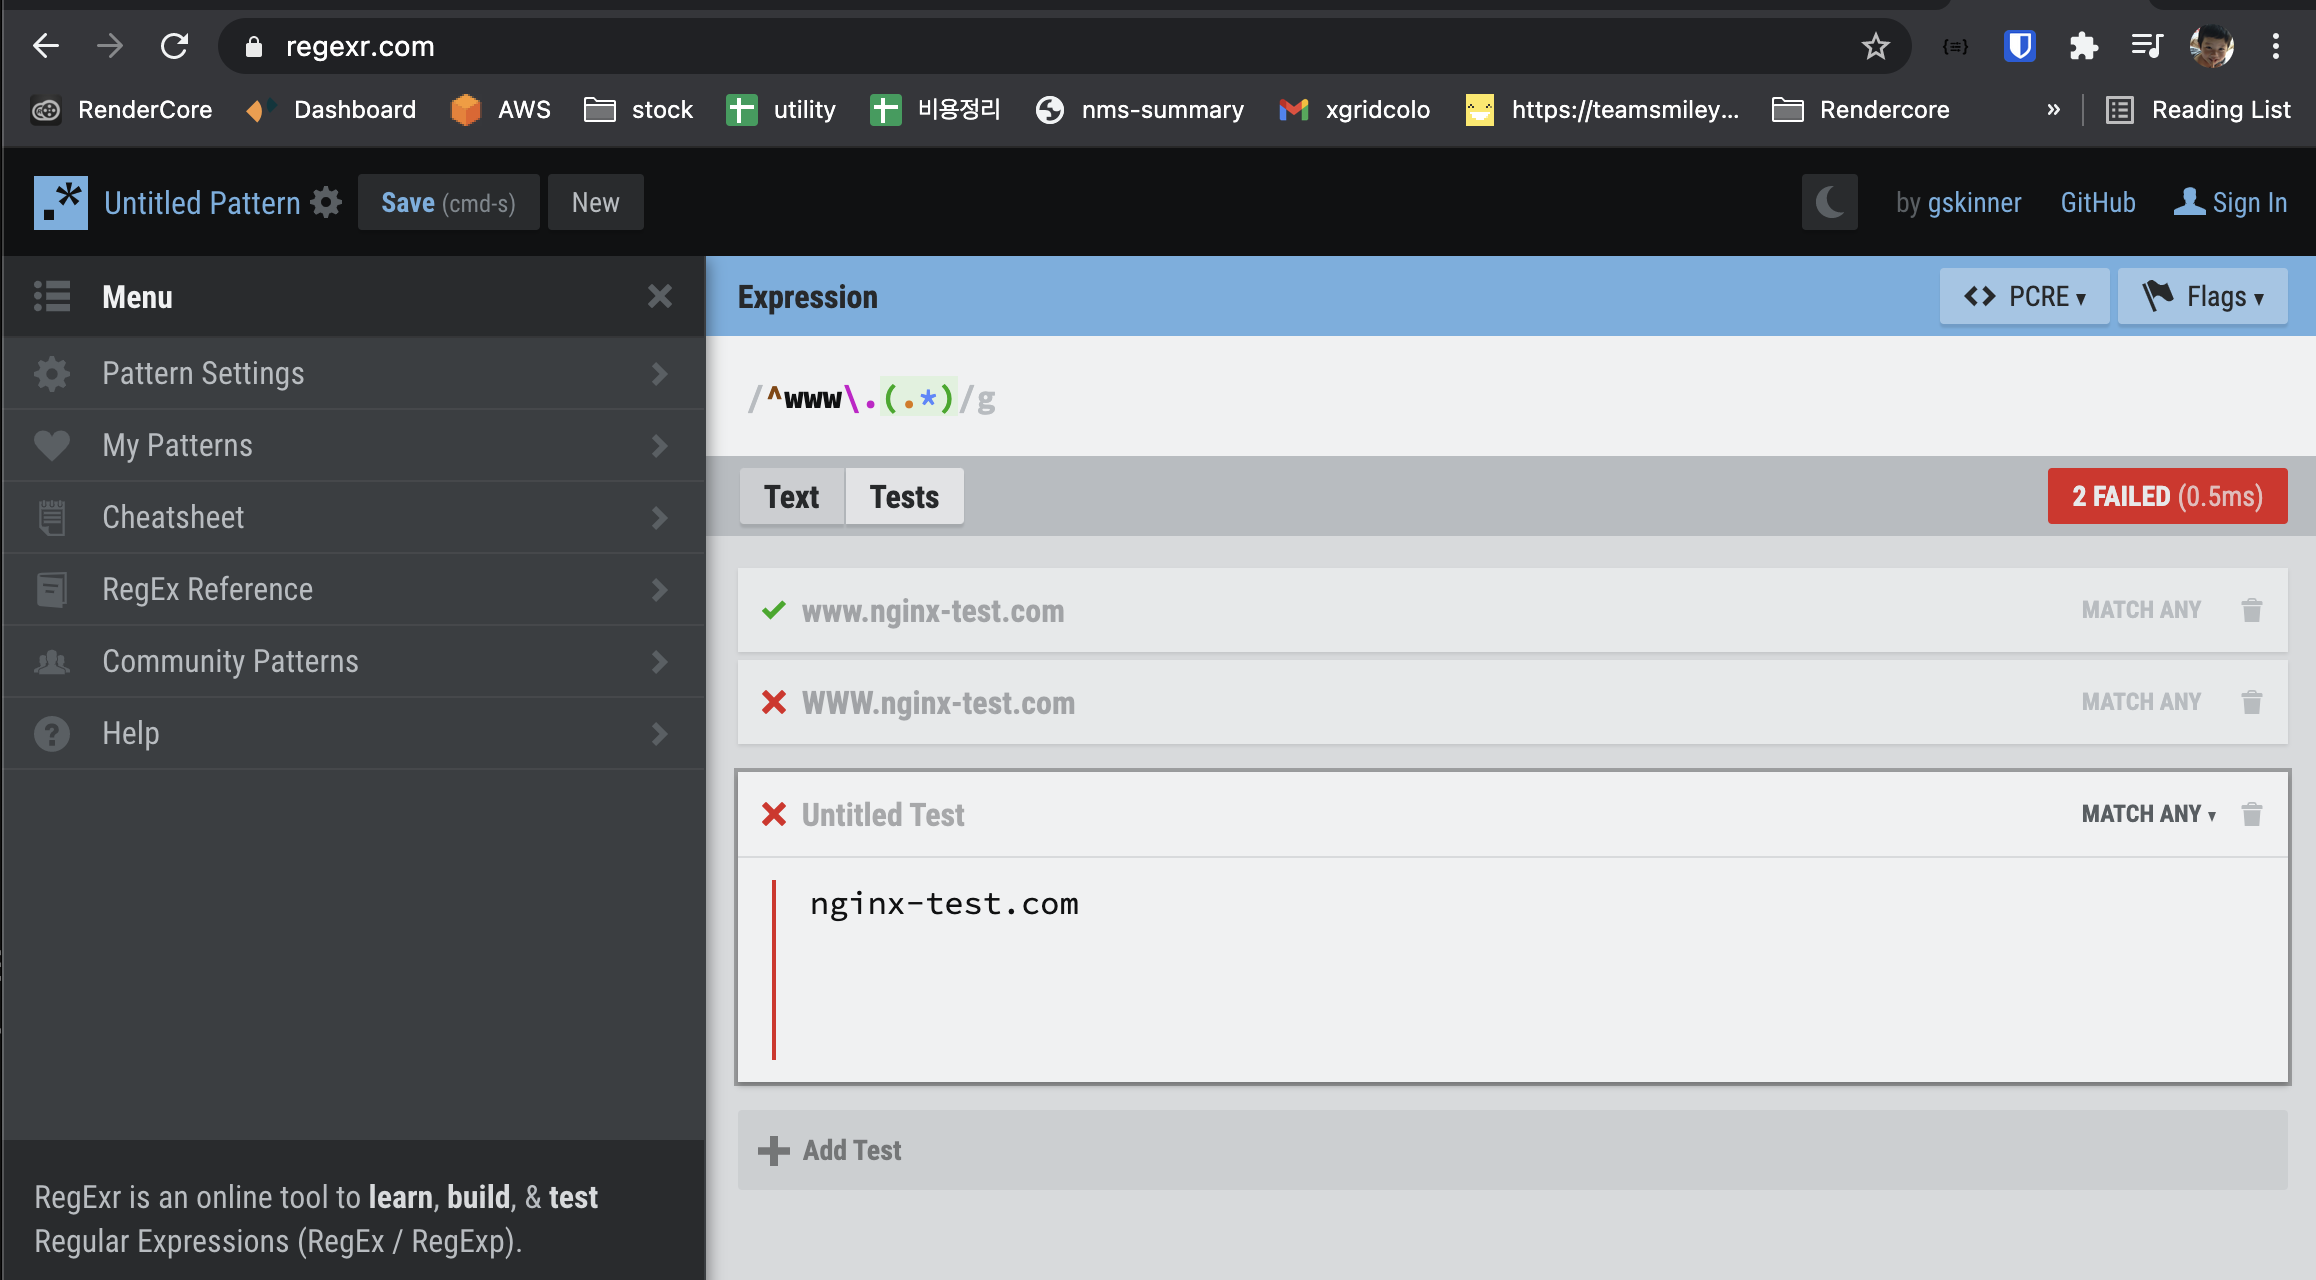
1개만 통과하는 것을 알수 있다.
WWW는(대문자) 안잘려야하는것아닌가? 테스트해보자. WWW.test-nginx.com 잘된다. 왜냐면 if에서 구분을 할때 ~*를 사용해서 case not sensitive 로 비교를 해서 되는듯 보인다.
그렇다면 대소구문 없이 정규식에서 짤리긴 짤린다는건데 그렇다면 정규식 옵션에서 case not sensitive로 구분 하는듯
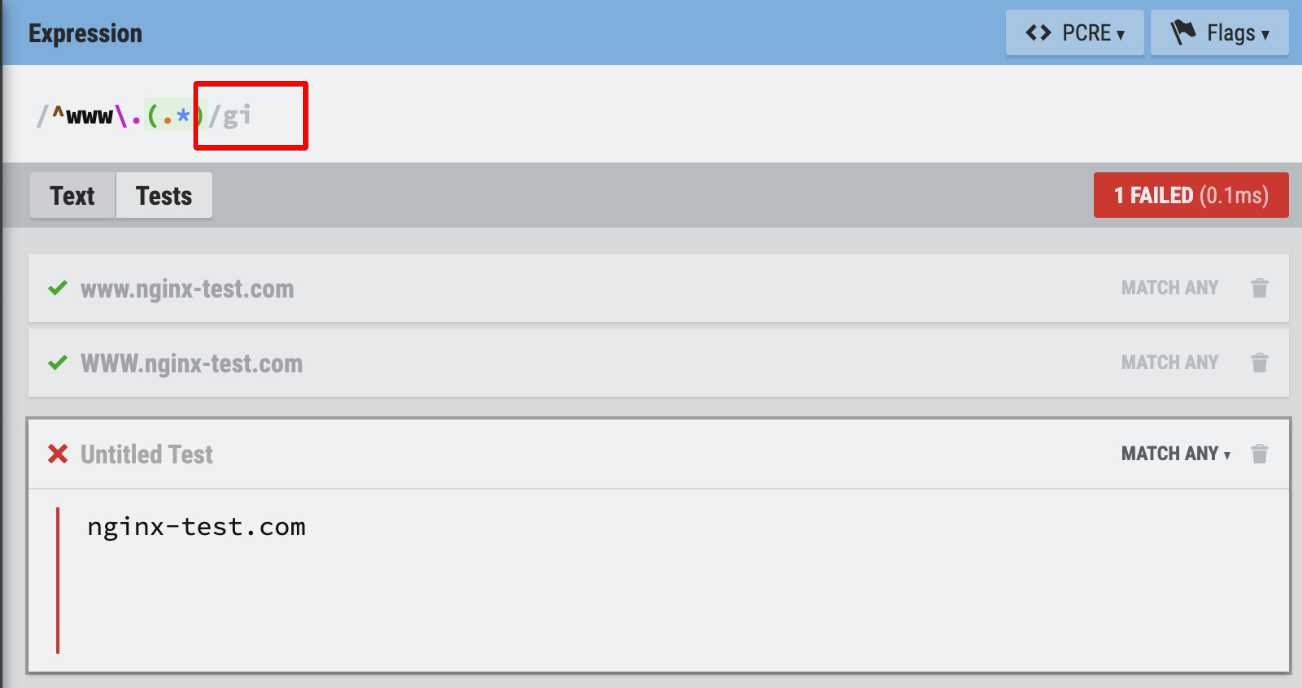
이렇게 옵션에서 구분을 안한다고하면 2개가 통과가 된다.
www가 없으면 www를 붙여주기
위와 반대로 www가 없으면 www를 붙여주려면 어떻게 해야할가?
vi default.conf
server {
    listen       80;
    server_name  test-nginx.com;
    rewrite ^(.*) http://www.test-nginx.com$1 permanent;
}

server {
    listen       80;
    server_name  www.test-nginx.com;

    location / {
        root   /usr/share/nginx/html;
        index  index.html index.htm;
    }
}
이렇게 하면 test-nginx.com 은 www.test-nginx.com 으로 보내준다.
^(.*) 정규식을 사용하는것을 알수 있다.
다양한 변수들
여기에서 개선해야 할점이 하나 보인다 rewrite 에 도메인명이 하드코딩되있다. 변수명이 있지 않을가? 확인해보자. http://nginx.org/en/docs/http/ngx_http_core_module.html#var_host
server {
    listen       80;
    server_name  test-nginx.com;
    rewrite ^(.*) http://$host$1 permanent;
}

server {
    listen       80;
    server_name  www.test-nginx.com;

    location / {
        root   /usr/share/nginx/html;
        index  index.html index.htm;
    }
}
http를 https로 보내기
server {
    listen       80;
    server_name  test-nginx.com;
    rewrite ^/(.*)$ https://$host$1 permanent;
}

server {
    listen       443;
    server_name  test-nginx.com;

    location / {
        root   /usr/share/nginx/html;
        index  index.html index.htm;
    }
}
역시 301을 받아서 https로 브라우저가 재요청 하는것을 볼수 있다.
정규식 리턴값
하다보니 왜 $1에 대한 설명이 없엇던듯 해서 추가해보면 정규식에서 짤라져서 나온 값이다.
server {
    listen       80;
    server_name  test-nginx.com;
    rewrite ^(.*) http://www.$host$1 permanent; # 여기
}

server {
    listen       80;
    server_name  www.test-nginx.com;

    location / {
        root   /usr/share/nginx/html;
        index  index.html index.htm;
    }
}
rewrite ^(.*) http://www.$host$1 permanent;에서 보면 들어오는 모든요청을 일단 정규식으로 자른다. 그리고 그걸 $host 다음에 붙여보자.
테스트 해보자.
http://test-nginx.com/aaa => http://www.test-nginx.com/aaa 로 변경이 된다.
$host가 /를 포함하는것으로 봐야한다.
aaa.test-nginx.com 을 test-nginx.com/myurl/aaa 로 변경하기
여기서 부터는 복잡해져서 정규식을 잘 알아야할듯 싶다.
일단 어떤 파서를 쓰는지 체크해보앗더니
https://www.nginx.com/blog/regular-expression-tester-nginx/
NGINX uses Perl Compatible Regular Expressions (PCRE).
pcre이다.
중요한건 www.test-nginx.com은 rewrite를 하면 안된다.
해보면
server {
    listen       80;
    server_name  ~^(?<subdomain>\w+)\.test-nginx\.com$;

    location / {
        root   /usr/share/nginx/html;
        index  index.html index.htm;
    }

    if ($host !~* ^www\.(.*)){
      rewrite ^ $scheme://www.test-nginx.com/myurl/$subdomain permanent;
    }
}
이렇게 하고 테스트를 해보면 www.test-nginx.com 은 그대로 있고 bbb.test-nginx.com은 www.test-nginx.com/myurl/bbb 로 rewrite된다.
여기에서는 regex named capture group를 사용했다. server_name ~^(?<subdomain>\w+)\.test-nginx\.com$; 이부분인데 매치되는 부분을 변수명으로 저장이 된다. ?<subdomain>
그래서 이 변수를 rewrite ^ $scheme://www.test-nginx.com/myurl/$subdomain permanent; 여기에서 사용이 가능해졌다.
이정도면 nginx conf를 대충 알것같다. regex를 잘 알아야햇네.
정리
- nginx variable을 문서를 보고 잘 알아둔다.
$host등 - regex에 매치되는 배열들을 가지고 와서
$1 $2을 사용하는것 - regex에서 named로 해서 변수명에 바로 넣어두는것.
- 기본 regex사용법
이상 nginx config를 정리할게요.