ionic deep link
재능기부로 핸드폰 앱을 하나 만들고 있는데 쉽지가 않다. oauth 로그인을 하고 redirect를 해서 토큰을 저장하는데 ionic serve로 로컬 개발 서버를 올려서 사용하면 잘되는데 이걸 핸드폰으로 옮겨서 실행하면 localhost(핸드폰)에 웹서버가 없으므로 로그인이 에러가 난다.
두달쯤 확인을 해보니 deep link라는걸 사용하면 된다고 한다. 여기까지가 어려웠다.
해보자.
참고 링크
https://capacitorjs.com/docs/guides/deep-links
deeplink
특정 주소를 핸드폰에 입력하면 앱으로 이동하는 기능을 딥링크라고한다.
schema
예전에는 schema를 사용하는 (myapp://) 방식이엿으나 앱이 없는경우 app store에 갔다가 오면 정보가 사라지는 문제가 있다고 함.
universal link(ios) , App Link(android)
요즘에는 사라지지 않는 universal link라는 방법을 추천
작동 방식은 웹서버에 apple-app-site-association (ios) , applinks.json (android) 이라는 경로를 만들어두고 요청이 들어오면 json을 결과로 리턴해주면 핸드폰에서 저 경로가 들어오면 앱을 오픈할거냐고 물어보거나 앱으로 리다이렉트 시켜준다. 앱이 실행되잇으면 특정 페이지(아래에서 말하는 slug)로 들어가게 된다
앱코드 구현
앵귤러를 사용하므로 참고문서처럼 작성한다.
import { Component, NgZone } from '@angular/core';
import { Router } from '@angular/router';
import { Plugins } from '@capacitor/core';
const { App } = Plugins;

constructor(private router: Router, private zone: NgZone) {
    this.initializeApp();
}

initializeApp() {
    App.addListener('appUrlOpen', (data: any) => {
        this.zone.run(() => {
            // Example url: https://beerswift.app/tabs/tab2
            // slug = /tabs/tab2
            const slug = data.url.split(".app").pop();
            if (slug) {
                this.router.navigateByUrl(slug);
            }
            // If no match, do nothing - let regular routing
            // logic take over
        });
    });
}
코드는 간단하다 appurlopen이라는걸 보고있다가 데이터가 들어오면 url에서 잘라내서 slug부분만 redirect해주는것이다.
IOS Configuration
앱에는 capacitor가 설정되잇어야 한다.
ionic build
npx cap add ios
npx cap copy ios
npx cap open ios
apple developer centor 에 가서 설정하고 관련 데이터 가져오기
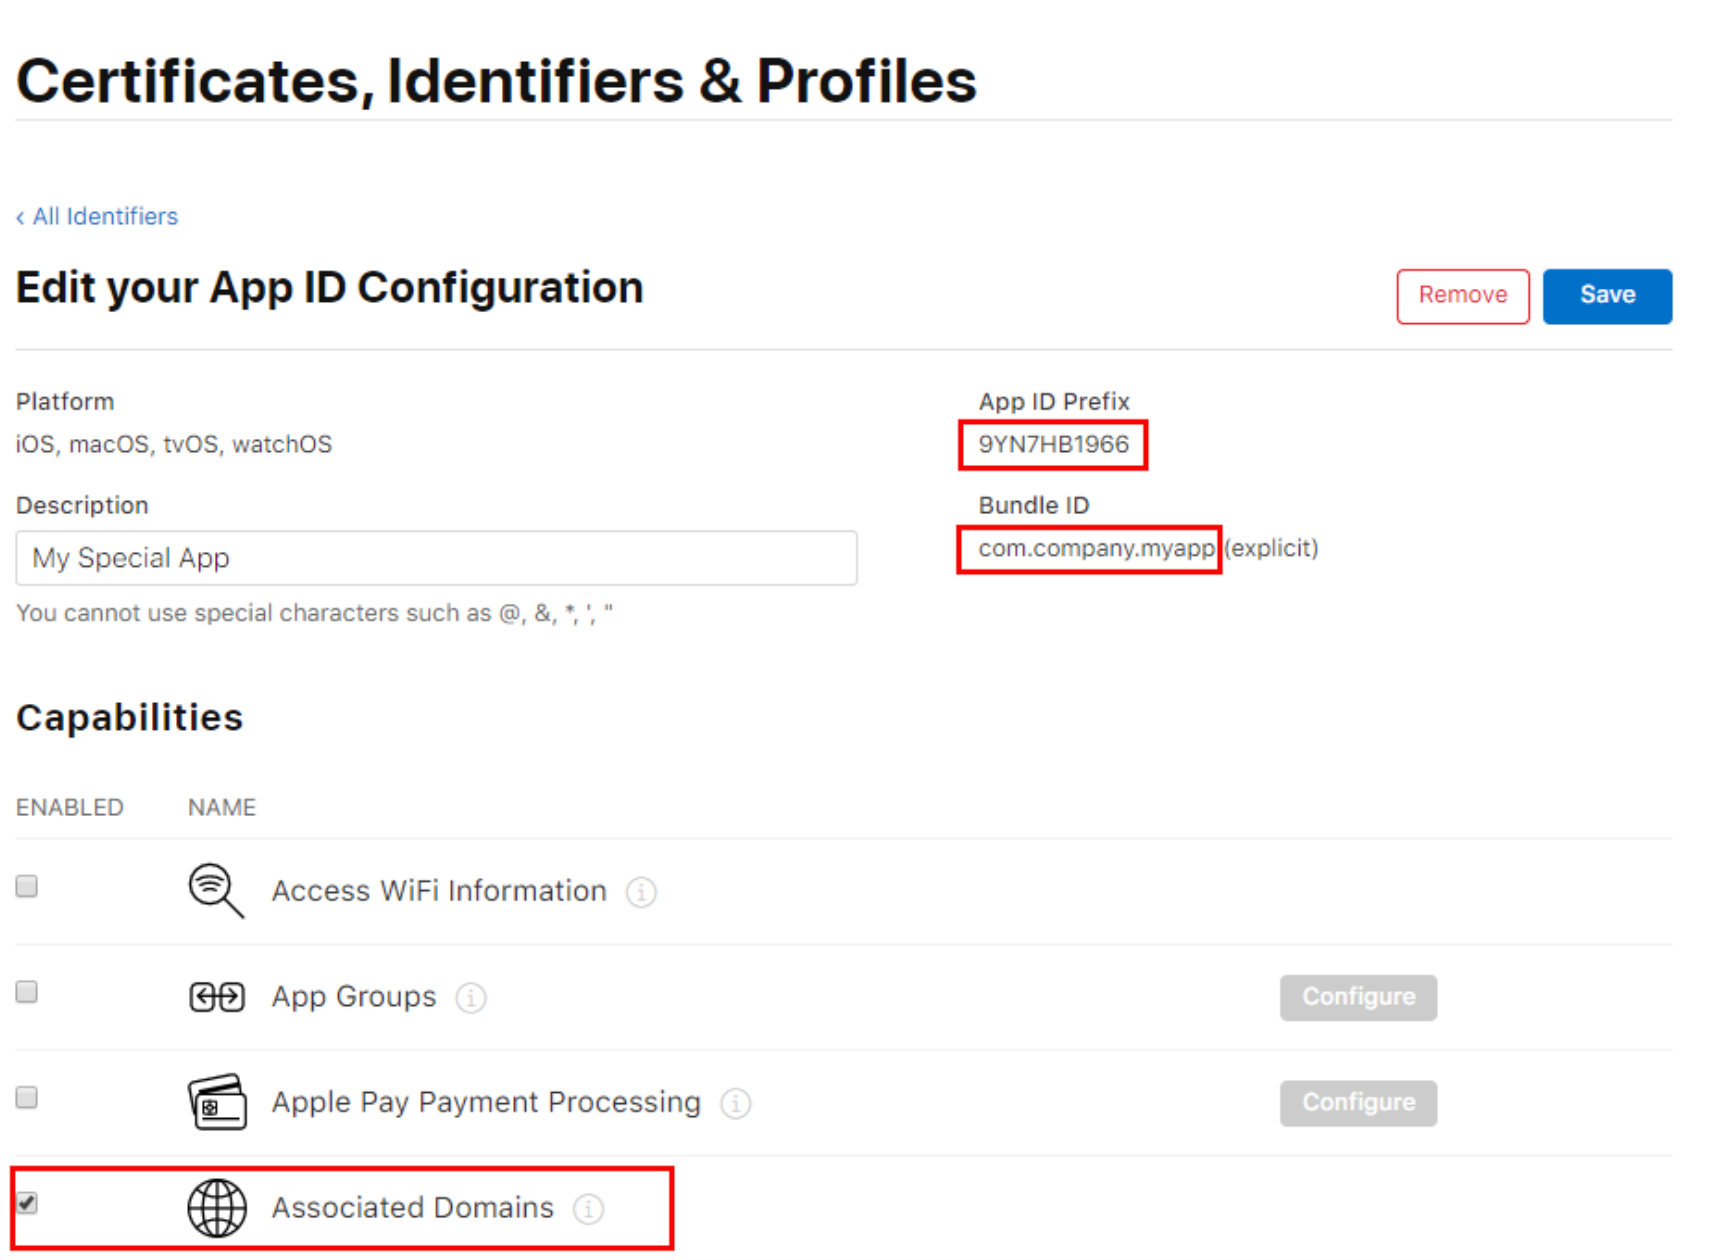
Team ID and Bundle ID를 적어두고 Capabilities에서 “Associated Domains” 을 체크박스를 켜주자.
Site Association Files 만들기
프로젝트에 src/.well-known 폴더를 만들고 거기에 apple-app-site-association 파일을 만든다. 확장자가 없다.
vi src/.well-known/apple-app-site-association
{
  "applinks": {
    "apps": [],
    "details": [
      {
          "appID": "appID": "TEAMID.BUNDLEID",
          "paths": ["*"]
      }
    ]
  }
}
angular.json
앵귤러 빌드시 src/.well-known폴더를 배포하기 위하여 수정해준다.
vi angular.json
"assets": [
            "src/favicon.ico",
            "src/assets",
            "src/.well-known" //추가
          ],
          "styles": [
            "src/styles.css"
          ],
Site Association Files 배포
일반적으로 웹사이트를 배포해서 파일을 서버에 올려두면된다. 주의할점은 mime type이 꼭 application/json 이어야 한다.
브라우저로 url을 확인해서 json 내용이 나오면 된다.
- docker 로 웹사이트를 배포한경우 여기서 나의 경우에는 문제가 발생했다 docker를 사용하다보니 도커에 nginx가 돌고 잇는기 기본 mime type이 application/octet-stream이 였다 그리서 url을 요청을 하게 되면 화면에 json이 나오는게 아니라 파일이 다운로드 받아져 버린다. 이 부분을 수정하기 위해 docker에 사용하는 nginx.conf파일을 수정을 했다.
vi nginx.conf
server {
  listen 80;
  root /usr/share/nginx/html;
  default_type application/json; # 여기 추가

  location / {
    index index.html index.htm;
    try_files $uri $uri/ /index.html =404;
  }
}
별건 아니고 기본 mime type을 application/json으로 세팅 해서 배포
이제 브라우저에서 요청을 해보면 json이 잘 보인다.
사파리를 열어서 직접 주소를 입력해보았다.
그랫더니 다음처럼 나온다.
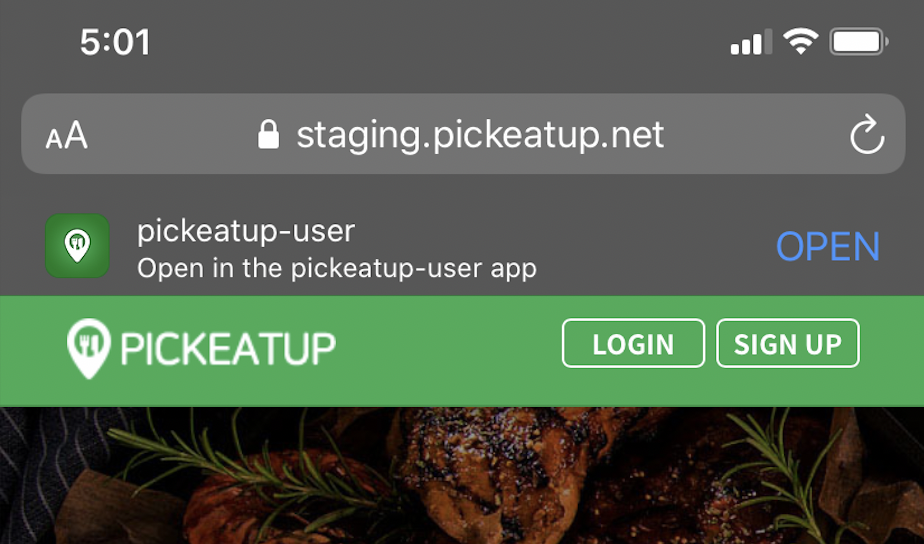
이러면 잘 적용된것이다.
https://branch.io/resources/aasa-validator 여기에서 도메인을 넣고 확인을 할수 있다.
Add Associated Domain
딥링크를 사용할 웹사이트 주소를 적어둔다. applinks:yourdomain.com 을 적어줘야한다. applink:은 꼭 필요
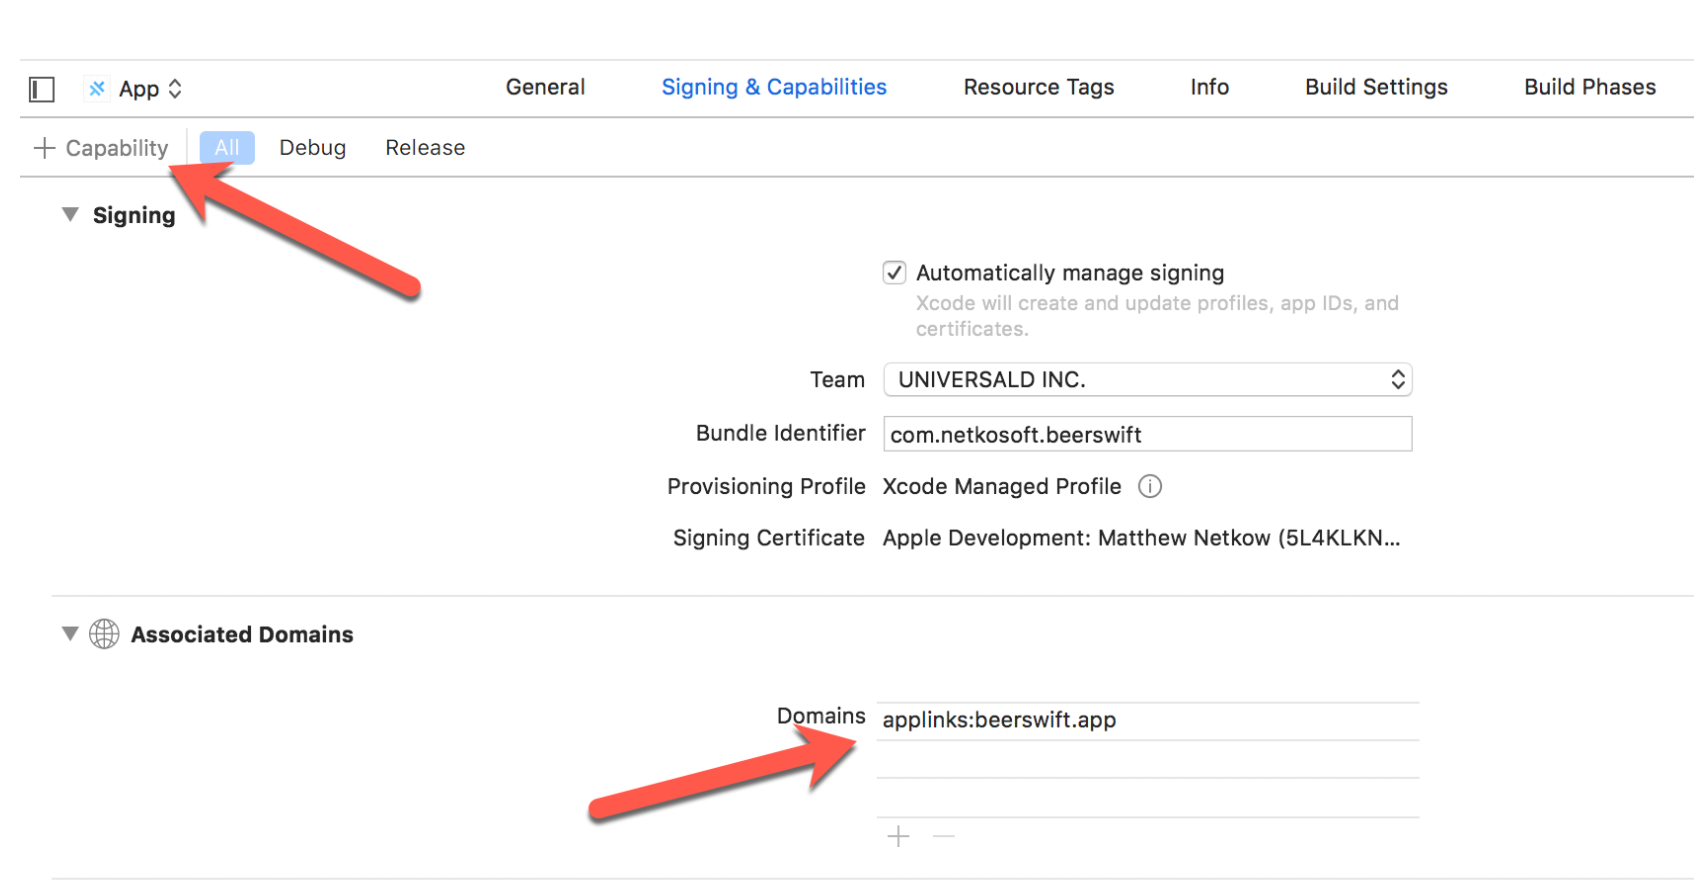
이제 redirect url이 넘어오면 자동으로 앱을 열 것이다.
이제 다 됫다 웹서버가 배포가 된후 yourdomain.com 이 적힌 이메일을 보내둔다.
핸드폰에서 그 이메일을 확인하고 링크를 클릭한다.
딥링크를 설정안한 경우에는 웹사이트가 열릴것이고 한 경우에는 앱이 열려야한다.
Android 구현
앱에는 capacitor가 설정되잇어야 한다.
ionic build
npx cap add android
npx cap copy android
npx cap open android
Site Association File
The Site Association file 은 SHA256 fingerprint 가 필요해요 만들어 보자.
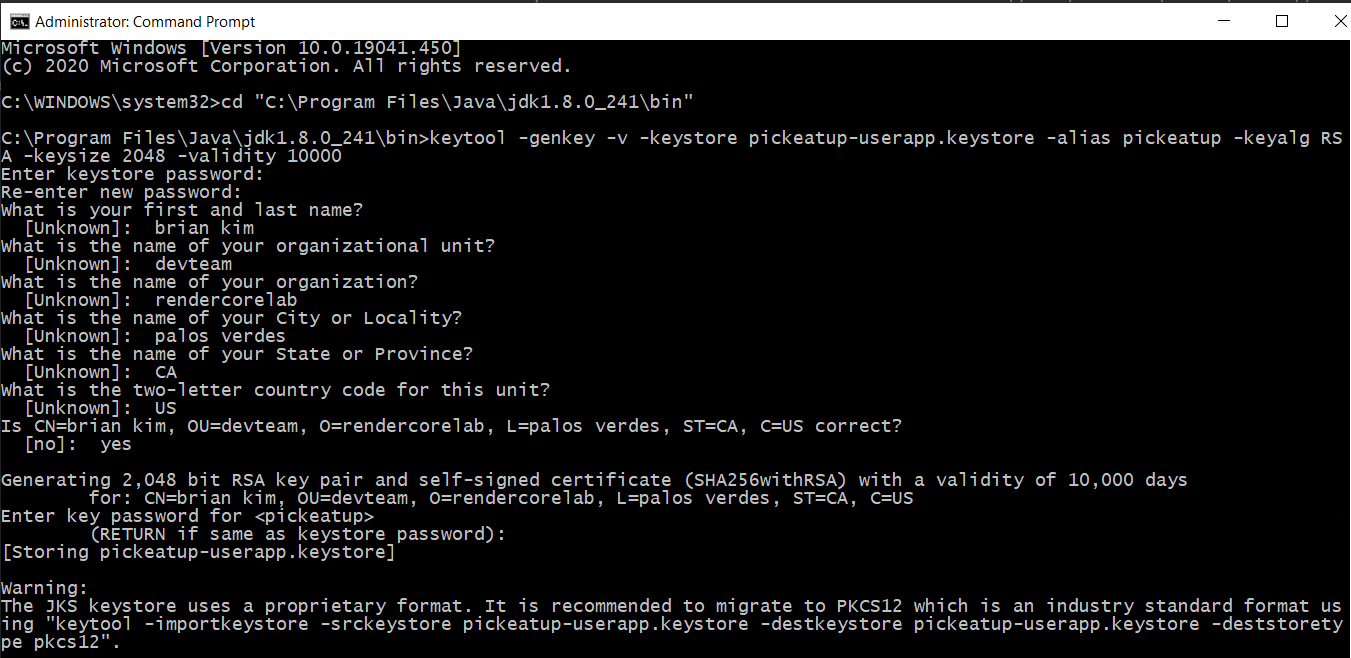
keytool은 자바를 설치하면 자동설치된다. 나의 경우에는 C:\Program Files\Java\jdk1.8.0_241\bin에 설치가 되어있다.
cmd를 실행하여 다음처럼 한다. 꼭 어드민 계정으로 cmd를 실행해야한다. 안하면 Access is Denied error
cd "C:\Program Files\Java\jdk1.8.0_241\bin"
#keytool -genkey -v -keystore KEY-NAME.keystore -alias ALIAS -keyalg RSA -keysize 2048 -validity 10000
keytool -genkey -v -keystore pickeatup-userapp.keystore -alias pickeatup -keyalg RSA -keysize 2048 -validity 10000
질문에 답변을 하면 키가 만들어진다.
키를 확인해보자.
keytool -list -v -keystore pickeatup-userapp.keystore
내용이 쭉 나오면 성공
이제 assetlinks.json 파일을 만들자.
https://developers.google.com/digital-asset-links/tools/generator 에서 만들수 있다.
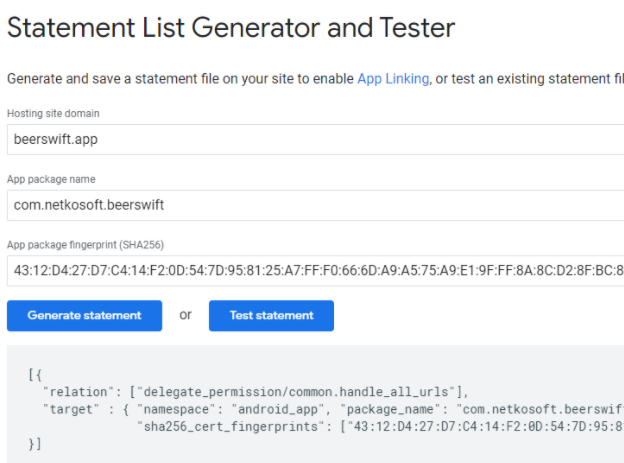
Generate statement 를 클릭하자.그럼 뭐가 만들어진다.
이걸 복사해서 .well-known/assetlinks.json 파일을 만들자.
// assetlinks.json
[
  {
    "relation": ["delegate_permission/common.handle_all_urls"],
    "target": {
      "namespace": "android_app",
      "package_name": "com.netkosoft.beerswift",
      "sha256_cert_fingerprints": [
        "43:12:D4:27:D7:C4:14..."
      ]
    }
  }
]
이 파일을 웹서버에 복사해서 넣어준다.
웹 경로에서 json이 보이는지 확인하자. https://yourdomain.com/.well-known/assetlinks.json
디플로이가 다 되면 다시 https://developers.google.com/digital-asset-links/tools/generator 이 사이트에서 test버튼을 클릭해보자.
성공이라고 나오면 된다.
이제 폰에서 확인하자.
웹사이트를 방문하면 앱을 열어라고 떠주면되는데?? 안되네? (ios만 되는듯)
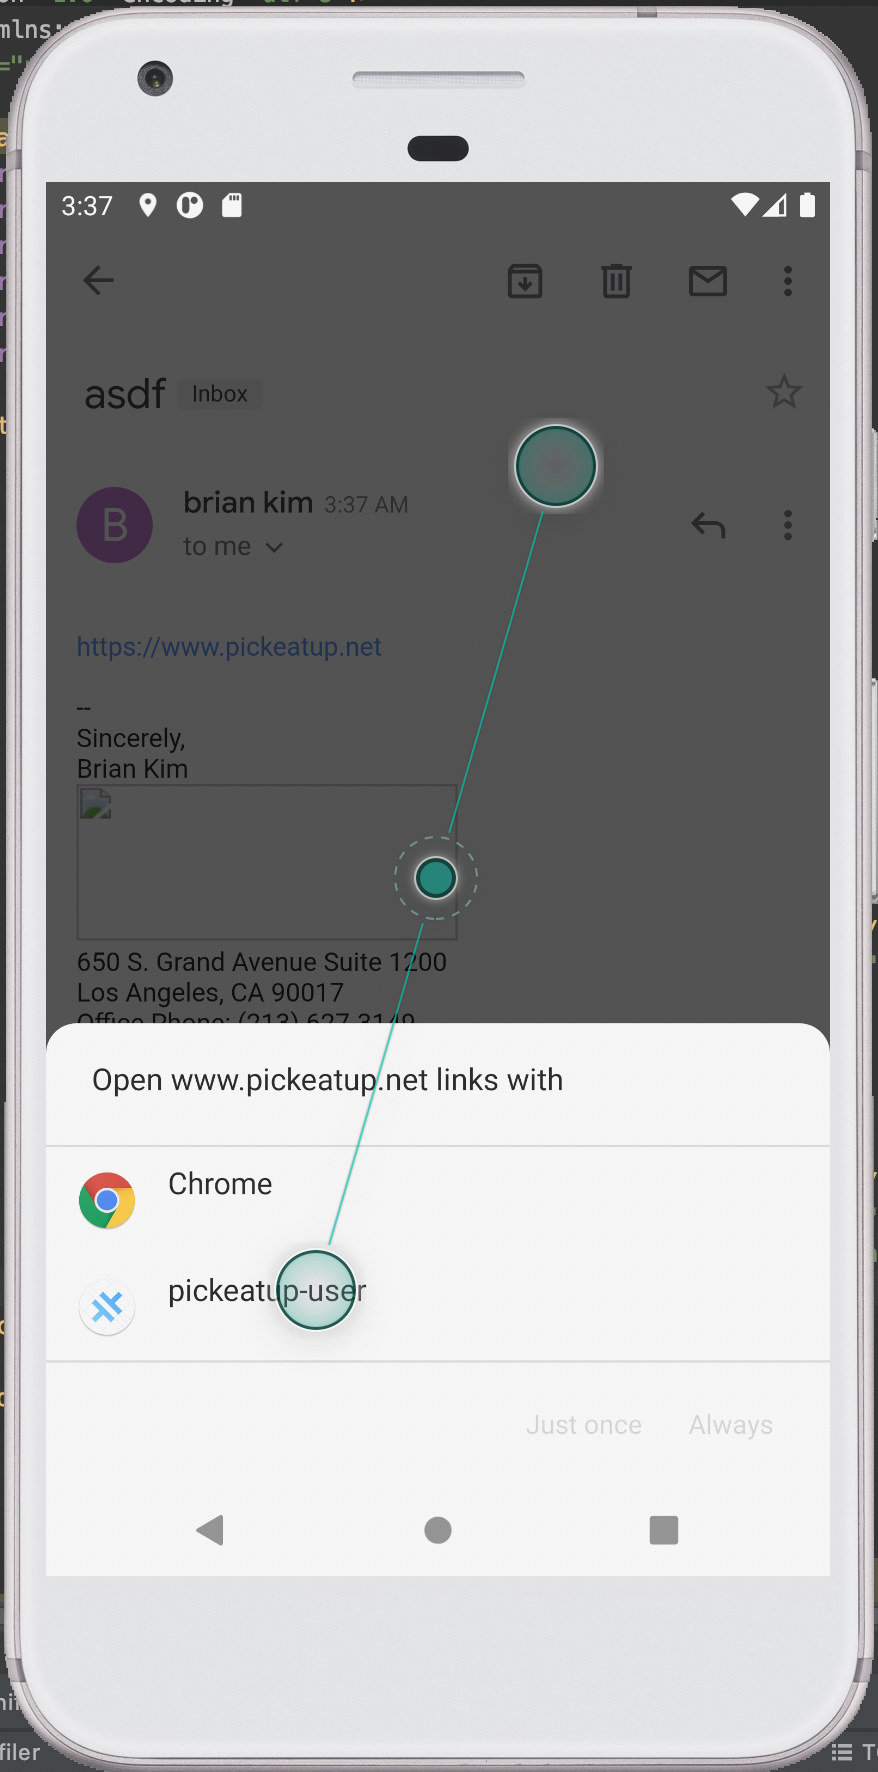
www.yourdomain.com 링크가 잇는 이메일을 보내두고 시뮬레이터에서 메일 설정을 해서 이메일을 받아보자.
이메일에 있는 링크를 누르면 다음같은 그림이 나오면 assetlinks.json 이 잘 된것이다.
다음은 참고
Unfortunately, App Links don’t work in all circumstances. Here are some common rules:
App Links may not work if you paste the link into the browser URL field.
App Links may not open the app when they are “wrapped” by tracking links.
Apps with built-in webviews (Google, Twitter, Facebook, Facebook Messenger, WeChat, etc.) may work with App Links only when a webview is already open. In other words, App Links could not work in-app from the feed or main app views.
Add Intent Filter
안드로이드 Os가 deep link를 인식하게 해주자.
새로운 Intent Filter 를 AndroidManifest.xml 에 추가하자.
안드로이드 스튜디오에서 android/app/src/main/AndroidManifest.xml 을 열어서 추가하자.
<intent-filter android:autoVerify="true">
    <action android:name="android.intent.action.VIEW" />
    <category android:name="android.intent.category.DEFAULT" />
    <category android:name="android.intent.category.BROWSABLE" />
    <data android:scheme="https" android:host="beerswift.app" />
</intent-filter>
이러면 다된다.
이제 웹브라우저에 redirect url로 값이 넘어오면 앱이 실행될것이다. 테스트해보자.
oauth login
oauth의 경우 redirect_url로 토큰이 오면 그걸 저장하고 사용한다. 웹사이트의 경우는 문제없이 되나 앱에서는 웹서버가 없기 때문에 잘안된다.
그래서 다음 프로세스를 거쳐야한다.
- 앱에서 로그인 버튼을 눌러서 auth서버로 보낸다.
- auth 서버(웹페이지)에서 로그인을 한다. redirect url을 실제 웹서버 주소로 보내주게 된다.
- os에서 실제 웹서버 주소가 딥 링크인걸 알아차리고 그주소를 앱으로 보내준다.
- 앱에서는 넘어온 토큰을 받아서 웹처럼 저장해두고 사용하면 된다.
웹사이트에서는 특정 url로 redirect를 해주는것이고 앱에서는 그 특정 url을 딥링크로 잡아서 앱으로 넘겨줘버리는것(os) 이고 앱에서는 그대로 받아서 처리하면되는거같다.