Angular 7 i18n with SSR
ng cli를 설치한다.
npm install -g @angular/cli
new project 생성
ng new i18n-sample --routing
cd i18n-sample
npm i
ng serve -o  //화면 잘 나오는지 확인 이건 ssr적용이 안된것이다.
기본 프로젝트가 실행됬다. 깃으로 파일 변경여부를 잘 확인 해가면서 보자.
새 컴포넌트 추가
ng g c users
# ng g c users --module app
vi app-routing.module.ts
import { UsersComponent } from './users/users.component';
const routes: Routes = [
...
{ path: "users", component: UsersComponent },
...
vi app.component.html 에 다음 추가
<a [routerLink]="['/users']">users</a>
SSR 을 설정하자
server side rendering이란 초기 요청은 서버에서 랜더링을 해서 보내주고 그 후 부터는 spa로 동작한다. ssr이 되면 검색엔진에 웹사이트 내용이 나오므로 seo에 도움이 된다.
https://github.com/maciejtreder/ng-toolkit
ng add @ng-toolkit/universal
npm run build:prod
npm run server # ssr test
ng serve -o # spa test
설명을 조금 하면 ng add @ng-toolkit/universal 를 하면 기존에 하나씩 파일을 추가해주던 것을 자동으로 해준다. 여러 매뉴얼을 보면 이 자동 작업을 수동으로 하는 매뉴얼들이 있다 필요하면 참고하기 바란다.
관련 파일들이 설치되면 npm run build:prod 를 실행하는데 이것은 package.json에서 확인가능하다 코드는 다음과 같다.
"build:server:prod": "ng run YOUR_APP:server && webpack --config webpack.server.config.js --progress --colors",

"build:browser:prod": "ng build --prod",

"build:prod": "npm run build:server:prod && npm run build:browser:prod",
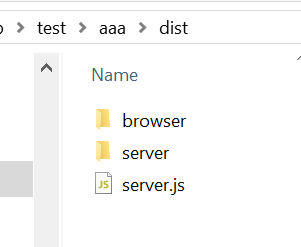
build:prod 를 실행하면 npm run build:server:prod (서버)이것이 실행되고 그다음에 npm run build:browser:prod (로컬)이것이 실행된다. 빌드 된 파일을 dist에 browser 와 server라는 폴더를 생성해서 거기에 넣어둔다.

–prod는 기본으로 –aot를 가지고 있다. angular.json에서 확인 가능
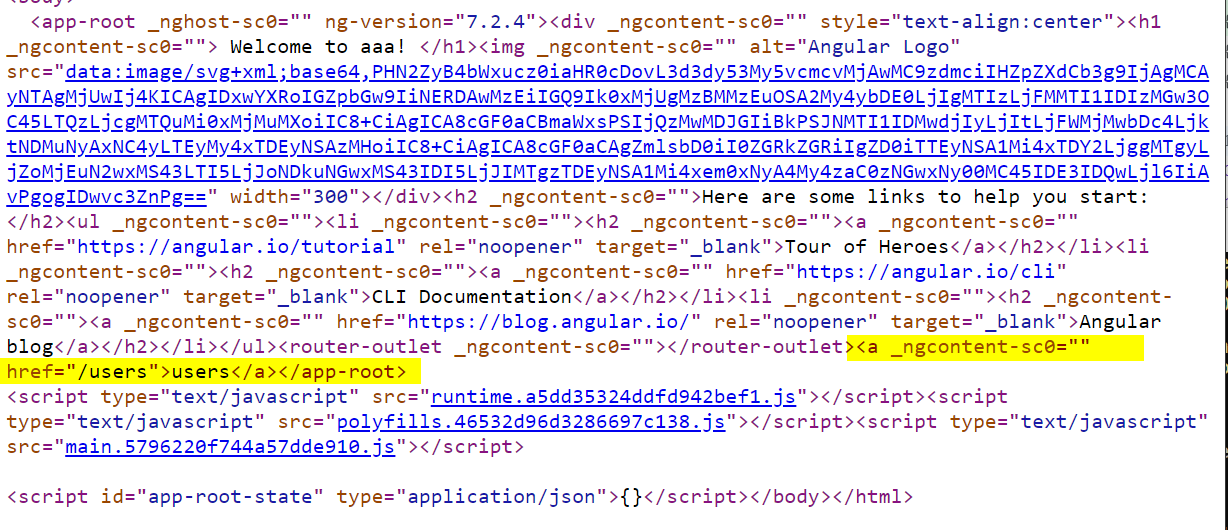
http://localhost:8080/에 접속해서 소스보기를 하면 ssr이 된것을 알수 있다. 컨텐츠 내용이 보이면 성공
소스보기를 보면 차이점을 알수 있다.


이제 실서버에 올려서 확인을 해보자. docker (nodejs)
vi .dockerignore
node_modules
dist
e2e
doc
README.md
.git
vi Dockerfile
# stage 1
FROM node:10 as node
WORKDIR /app
COPY . .
RUN npm install
RUN npm run build:prod
EXPOSE 80
CMD [ "node", "local.js" ]
도커 빌드후 실행
docker build . -t my-app
docker run -it  -p 80:8080 my-app
처음 요청시 소스코드를 보면 전체 내용이 있는것을 알수 있다. 그러나 링크를 클릭하면 페이지가 다 로드되는것이 아니라 싱글페이지앱으로 동작한다.
결론은 첫 요청은 server side rendering으로 돌고 그 후 요청은 전부 spa로 동작한다. seo가 잘 될듯.
environment 사용
users.component.ts수정
export class UsersComponent implements OnInit {
  isProduction: boolean = environment.production; //추가
  ngOnInit() {
  }
}
users.component.html
<p>
   users works!
</p>
spa로 확인해보자.
ng serve -o
잘된다. 이제 ssr로 빌드 해보자.
npm run build:server:prod
error TS2307: Cannot find module 'src/environments/environment'. 에러가 난다.
고쳐보자.
tsconfig.json 을 수정하자.
//...
"baseUrl": "./src", #맨윗줄 수정
"paths": {
  "@environments/*": [
    "environments/*"
  ]
}
//...
users.components.ts 수정
// import { environment } from 'src/environments/environment';
import { environment } from '@environments/environment';
다시 빌드해보자.
npm run build:server:prod
에러없이 빌드는 된다.
도커 빌드후 테스트
docker build . -t my-app
docker run -it  -p 80:8080 my-app
동작한다.
SPA로 테스트
ng serve -o
동작한다.
i18n
앵귤러 빌드를 언어별로 해서 각각의 dist폴더를 만들어서 넣어서 고객의 언어에 따라서 /ko 등으로 보내주려고 한다.
한가지 주의할점은 언어변환은 사이트가 끝나면 해야할듯 싶다. html내용에 줄바꿈등이 잇으면 아이디가 달라져버린다.. 이걸 다들 어떻게 처리하는지 모르겟음.
필요한 화면에 표시를 한다.
src/app/app.component.html에서 다국어를 원하는 곳에 i18n을 붙인다.
<h2 i18n >Here are some links to help you start: </h2>
generate language file
mkdir src/locale
ng xi18n --output-path locale --out-file messages.en.xlf
cp src/locale/messages.en.xlf src/locale/messages.ko.xlf
기본 파일을 앵귤러가 자동으로 생성해준다.
일단 기본파일에 ko를 붙여서 한글 파일을 만들어보자.
이걸 열어보면
messages.ko.xlf
<?xml version="1.0" encoding="UTF-8" ?>
<xliff version="1.2" xmlns="urn:oasis:names:tc:xliff:document:1.2">
  <file source-language="en" datatype="plaintext" original="ng2.template">
    <body>
      <trans-unit id="54f29f9a6da150fc7c4fcd0b7e6d9a1b0314fd35" datatype="html">
        <source>Here are some links to help you start: </source>
        <target>당신이 시작하는데 도움이 될 만한 링크입니다. </target>
        <context-group purpose="location">
          <context context-type="sourcefile">app/app.component.html</context>
          <context context-type="linenumber">8</context>
        </context-group>
      </trans-unit>
    </body>
  </file>
</xliff>
spa 언어 적용 (ssr은 안됨)
angular.json 수정하자
ng build와 ng serve를 한글로 서비스할수 있게 처리하려고 한다.
architect » build » configurations » production을 복사해서 붙여넣기한후 이름을 ko로 바꾼다.
"production-ko": {
  "fileReplacements": [
    {
      "replace": "src/environments/environment.ts",
      "with": "src/environments/environment.prod.ts"
    }
  ],
  "optimization": true,
  "outputHashing": "all",
  "sourceMap": false,
  "extractCss": true,
  "namedChunks": false,
  "aot": true,
  "extractLicenses": true,
  "vendorChunk": false,
  "buildOptimizer": true,
  "budgets": [
    {
      "type": "initial",
      "maximumWarning": "2mb",
      "maximumError": "5mb"
    }
  ],
  //아래추가
  "outputPath": "dist/browser/ko",
  "i18nFile": "src/locale/message.ko.xlf",
  "i18nFormat": "xlf",
  "i18nLocale": "ko",
  "i18nMissingTranslation": "error"
}
architect » serve » configurations » production을 복사해서 ko를 만든다.
"production": {
  "browserTarget": "renderfarm-app:build:production"
},
"production:ko": {
  "browserTarget": "renderfarm-app:build:production-ko"
}
영어는?
"outputPath": "dist/browser/en",
"baseHref": "/en/",
"i18nFile": "src/locale/messages.en.xlf",
"i18nFormat": "xlf",
"i18nLocale": "en",
"i18nMissingTranslation": "error"
기존 build » configurations » production 에 위를 추가한다.
빌드해보자.
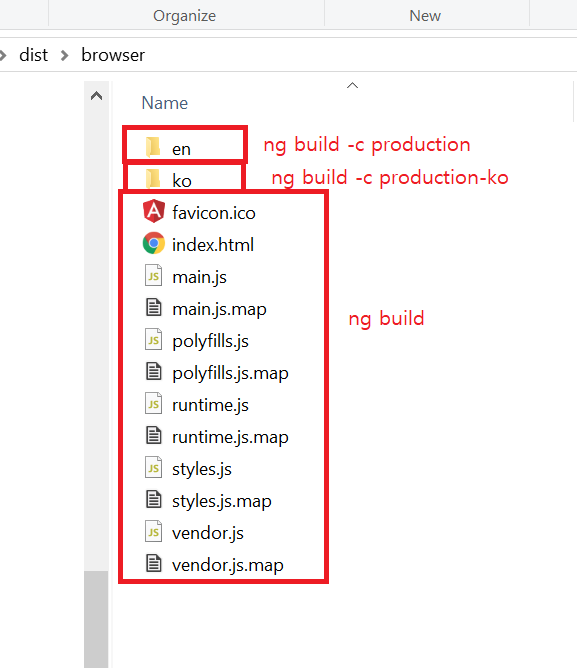
ng build  # 언어 적용 안된것
ng build --configuration=production # 영어 적용
ng build --configuration=production-ko # 한글 적용

실행
ng serve # 언어 적용 안된것
ng serve --configuration=production # 영어 적용
ng serve --configuration=production-ko # 한글 적용
ng build 를 하면 언어 설정이 없이 사이트가 돌아가기 때문에 빼야할듯 싶다.
http://localhost:4200/ 해보면 한글로 바뀌어 나온다.
i18n은 잘된것을 알수 있다. 이제 다른언어들도 다 변환하여 package.json에 추가하면 될 것이다.
package.json 에 추가하자.
//"build:browser:prod": "ng build --prod",
"build:browser:prod": "ng build --configuration=production && ng build --configuration=production-ko",
빌드해보자.
npm run build:browser:prod
서버 빌드를 해보자.
npm run build:server:prod
/로 접속시 고객의 언어에 따라서 각 페이지로 보내보자.
브라우저 언어가 한글이면 /ko로 다른거는 전부 /로
app.get('/*', (req, res) => {
  const supportedLocales = ['en', 'ko'];
  var defaultLocale = 'en';

  var lang = req.acceptsLanguages(supportedLocales);
  if (lang) {
    console.log('The first accepted of [en,ko] is: ' + lang);
    defaultLocale = lang;
  } else {
    console.log('None of [en,ko] is accepted');
  }

  const matches = req.url.match(/^\/([a-z]{2}(?:-[A-Z]{2})?)\//);
  //check if the requested url has a correct format '/locale' and matches any of the supportedLocales
  const locale = (matches && supportedLocales.indexOf(matches[1]) !== -1) ? matches[1] : defaultLocale;

  res.render(`${locale}/index`, { req, res }, (err, html) => {
    if (html) {
      res.send(html);
    } else {
      console.error(err);
      res.send(err);
    }
  });
});
고객 언어를 찾아서 지원 소프트웨어와 비교해서 있으면 default lang을 바꾼다.
그러나 일부러 주소에 언어를 바꿔서 들어온경우는 그 언어를 유지해준다.
다시 테스트해보자.
npm run build:prod && npm run server
테스트 가능
페이지에서 언어를 선택할수 있게 하기
결과는 다음과 같다.
app.components.ts
export class AppComponent {
  //..
  currentLanguageCode: string = "en";

  languages = [
    { code: "en", label: "English", seleted: false },
    { code: "ko", label: "한국어", seleted: false }
  ];

  constructor(@Inject(LOCALE_ID) public localeId: string) {}

  ngOnInit() {
    if (this.localeId == "ko") this.currentLanguageCode = "ko";
    else this.currentLanguageCode = "en";
  }
}
app.component.html
<div class="mr-md-3">
  <select name="select" class="btn btn-outline-warning btn-sm" onchange="window.open(value,'_self');">
    <option *ngFor="let language of languages" value="//" [selected]="language.code==currentLanguageCode"></option>
  </select>
</div>
테스트 하자
npm run build:prod && npm run server
ssr에서 언어도 바뀌면 좋겠음.
여전히 문제가 하나 있다 ssr시 화면에 언어별로 잘보이나 소스보기를 하면 영어로 나온다.
일단 서버도 언어를 넣어서 빌드해야한다.
angular.json을 수정한다.
"server": {
  "builder": "@angular-devkit/build-angular:server",
  "options": {
    "main": "src/main.server.ts",
    "tsConfig": "src/tsconfig.server.json",
    "outputPath": "dist/server/en",
    "i18nFile": "src/locale/messages.en.xlf",
    "i18nFormat": "xlf",
    "i18nLocale": "en",
    "i18nMissingTranslation": "error"
    }
  },

"server-ko": {
  "builder": "@angular-devkit/build-angular:server",
  "options": {
    "main": "src/main.server.ts",
    "tsConfig": "src/tsconfig.server.json",
    "outputPath": "dist/server/ko",
    "i18nFile": "src/locale/messages.ko.xlf",
    "i18nFormat": "xlf",
    "i18nLocale": "ko",
    "i18nMissingTranslation": "error"
    }
  }
서버 빌드를 해보자.
package.json
// 기존코드
// "build:server:prod": "ng run my-app:server && webpack --config webpack.server.config.js --progress --colors",

"build:server:prod": "ng run my-app:server && ng run my-app:server  && webpack --config webpack.server.config.js --progress --colors",
이부분은 서버를 실행할때 언어를 넣어줘야한다.
npm run build:server:prod
server.ts에서
const { AppServerModuleNgFactory, LAZY_MODULE_MAP } = require('./dist/server/main');

// const { AppServerModuleNgFactory, LAZY_MODULE_MAP } = require('./dist/server/ko/main');
위 코드를 주석처리하고 아래코드를 사용하면 소스보기를해도 한글이 잘 보인다.
현재 동적으로 되는건 아직 해결 못함.
https://github.com/teamsmiley/angular7-i18n-ssr
참고사항
일단 기본 페이지에는 다음처럼 코딩한다.
<div>
Company Advance
<div>
그리고 언어파일로 변경한후 그 언어파일에 구체적인 내용을 적는다.
그리고 나면 angular.json에서 production에서 언어 파일 내용을 추가해준다.
그래야 한다.
또 알아둬야할것은 보통 이렇게 사용한다.
<h1 i18n>Hello i18n!</h1>
그런데 이렇게 되면 앞뒤에 파일이 바뀌면 아이디가 바뀌게 된다. 나중에 복잡해진다.
아이디를 같이 넣는걸 추천한다.
<h1 i18n="@@introductionHeader">Hello i18n!</h1>
이렇게 되면 앞에 글처럼 영어를 기본으로 해두는 설정은 필요가 없을듯.
- 주의사항 추가
window.location.href 은 서버사이드 랜더링에서 사용되서는 안된다. 기타 몇가지 더있는건 찾을때마다 업데이트하겟다.