Angular 6 i18n with SSR
ng cli를 설치한다.
npm install -g @angular/cli
new project 생성
ng new i18n-sample --routing
cd i18n-sample
npm i
ng serve -o  //화면 잘 나오는지 확인 이건 ssr적용이 안된것이다.
기본 프로젝트가 실행됬다. 깃으로 파일 변경여부를 잘 확인 해가면서 보자.
SSR 시 사용하는 패키지 설정
npm install --save @angular/platform-server @nguniversal/module-map-ngfactory-loader ts-loader @nguniversal/express-engine

npm install --save-dev  webpack-cli@2.0.14
SSR 적용 (aot포함))
ng generate universal --client-project i18n-sample
npm i
기존에는 여러곳에 파일을 추가하고 수정해주여야 하였으나 ng cli 6.0이후부터는 이렇게 쉽게 템플릿 코드들이 추가가 되었다.
깃으로 변경 내용을 꼭 확인해보자.
추가 파일을 작성하자.
/server.ts
/webpack.server.config.js
파일 내용은 소스코드를 참고 하기 바람
app.server.module.ts 수정
import { ServerModule } from '@angular/platform-server';
import { ModuleMapLoaderModule } from '@nguniversal/module-map-ngfactory-loader'; //추가
...

@NgModule({
  imports: [
    AppModule,
    ServerModule,
    ModuleMapLoaderModule //추가
  ],
...
Build 설정
angular.json 수정
"architect": {
"build": {
"builder": "@angular-devkit/build-angular:browser",
"options": {
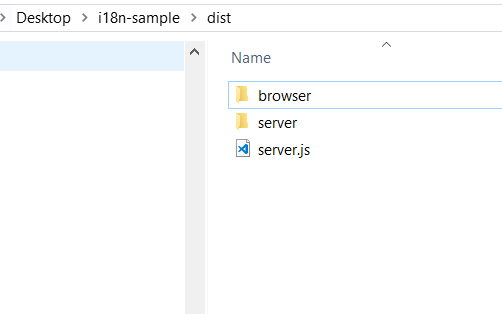
"outputPath": "dist/browser", //수정
"index": "src/index.html",
...
}
}
"server": {
"builder": "@angular-devkit/build-angular:server",
"options": {
"outputPath": "dist/server",
"main": "src/main.server.ts",
"tsConfig": "src/tsconfig.server.json"
}
}
...
package.json 에 추가하자.
"scripts": {
    ...
    "build:ssr": "npm run build:client-and-server-bundles && npm run webpack:server",
    "serve:ssr": "node dist/server",
    "build:client-and-server-bundles": "ng build --prod && ng run i18n-sample:server",
    "webpack:server": "webpack --config webpack.server.config.js --progress --colors"
    ...
}
간단히 설명을 하면 앱이 빌드가 한번 되고 ssr용으로 빌드를 한번 더한다. 그후에 webpack을 이용하여 변환을 한번 더한다. –prod는 기본으로 –aot를 가지고 있다. angular.json에 prod를 보면 알수 있다. 그러므로 –prod만 하면 aot가 적용이 된다.
build
npm i
npm run build
npm run build:ssr //ssr
serve
ng serve -o
npm run serve:ssr //ssr
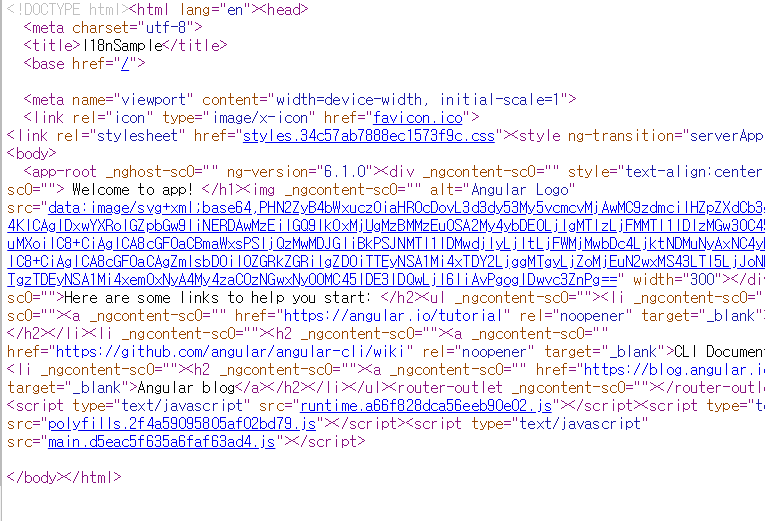
http://localhost:4000/에 접속해서 소스보기를 하면 ssr이 된것을 알수 있다.
잘 모르겟으면 ng serve -o 를 해서 두개의 소스를 비교하면 알수 있을것이다.

이제 실서버에 올려서 확인을 해보자. (iis사용)
미리 해둬야할것
- Windows Vista, Windows 7, Windows 8, Windows Server 2008, or Windows Server 2012
- IIS 7.x with IIS Management Tools and ASP.NET
- WebSocket functionality requires IIS 8.x on Windows 8 or Windows Server 2012
- URL rewrite module for IIS ( 이거 꼭 중요하다.)
- Latest node.js build for Windows
iisnode 설치
참고 : https://github.com/tjanczuk/iisnode
https://github.com/tjanczuk/iisnode/releases 에서 다운받아서 설치한다.
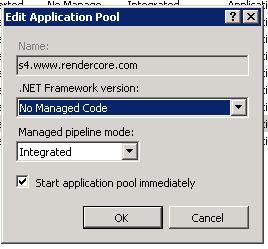
이제 site를 iis에서 만들고 어플리케이션 풀은 다음처럼 세팅한다.
이제 빌드해둔 파일을 서버로 옮긴다.
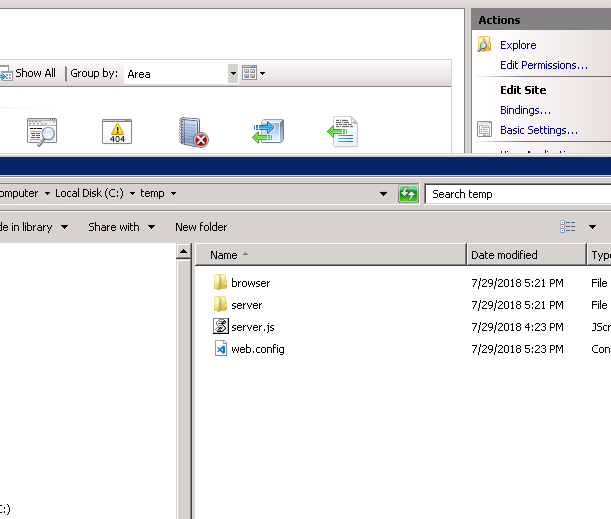
web.config 설정
웹사이트 제일 상위 폴더에 wwwroot를 만들고 web.config 파일을 만든다.
<configuration>
  <system.webServer>
    <handlers>
      <add name="iisnode" path="server.js" verb="*" modules="iisnode" />
    </handlers>
    <rewrite>
      <rules>
        <rule name="All Traffic" stopProcessing="true">
          <match url=".*" />
          <action type="Rewrite" url="server.js" />
        </rule>
      </rules>
    </rewrite>
  </system.webServer>
</configuration>
iisnode가 리퀘스트를 처리하게 핸들러를 추가한다. 모든 요청은 server.js로 가게 된다.
iis를 실행하고 브라우저에서 접속해서 확인해본다.
소스보기도 해서 ssr 이 잘된건지 확인한다.
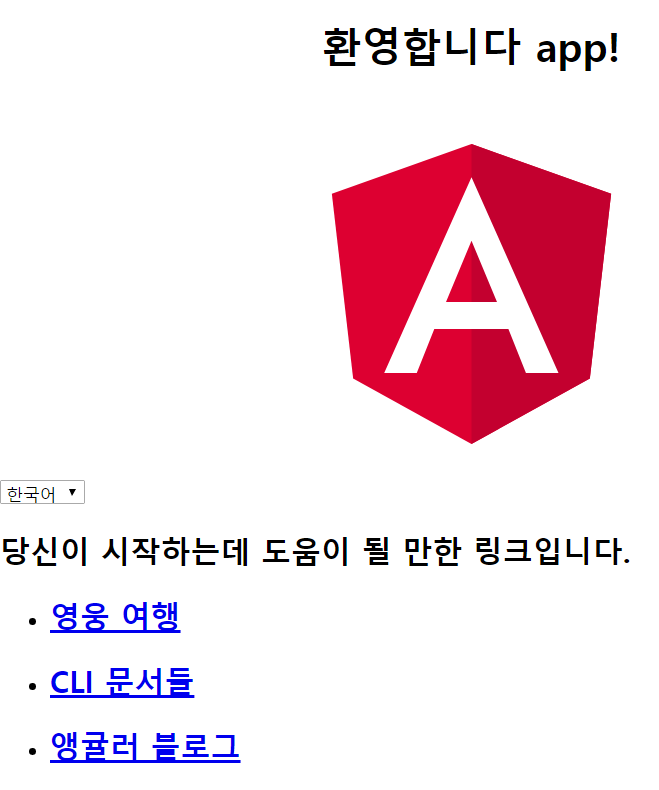
다국어가 필요한 화면에 표시를 한다.
src/app/app.component.html에서 다국어를 원하는 곳에 i18n을 붙인다.
<!--The content below is only a placeholder and can be replaced.-->
<div style="text-align:center">
  <h1 i18n >
    Welcome to !
  </h1>
  <img width="300" alt="Angular Logo" src="data:image/svg+xml;base64,PHN2ZyB4bWxucz0iaHR0cDovL3d3dy53My5vcmcvMjAwMC9zdmciIHZpZXdCb3g9IjAgMCAyNTAgMjUwIj4KICAgIDxwYXRoIGZpbGw9IiNERDAwMzEiIGQ9Ik0xMjUgMzBMMzEuOSA2My4ybDE0LjIgMTIzLjFMMTI1IDIzMGw3OC45LTQzLjcgMTQuMi0xMjMuMXoiIC8+CiAgICA8cGF0aCBmaWxsPSIjQzMwMDJGIiBkPSJNMTI1IDMwdjIyLjItLjFWMjMwbDc4LjktNDMuNyAxNC4yLTEyMy4xTDEyNSAzMHoiIC8+CiAgICA8cGF0aCAgZmlsbD0iI0ZGRkZGRiIgZD0iTTEyNSA1Mi4xTDY2LjggMTgyLjZoMjEuN2wxMS43LTI5LjJoNDkuNGwxMS43IDI5LjJIMTgzTDEyNSA1Mi4xem0xNyA4My4zaC0zNGwxNy00MC45IDE3IDQwLjl6IiAvPgogIDwvc3ZnPg==">
</div>
<h2 i18n >Here are some links to help you start: </h2>
<ul>
  <li>
    <h2><a target="_blank" rel="noopener" href="https://angular.io/tutorial" i18n >Tour of Heroes</a></h2>
  </li>
  <li>
    <h2><a target="_blank" rel="noopener" href="https://github.com/angular/angular-cli/wiki" i18n >CLI Documentation</a></h2>
  </li>
  <li>
    <h2><a target="_blank" rel="noopener" href="https://blog.angular.io/" i18n >Angular blog</a></h2>
  </li>
</ul>

<router-outlet></router-outlet>
generate language file
ng xi18n
mkdir src\locale
move src\messages.xlf src\locale
copy src\locale\messages.xlf src\locale\messages.ko.xlf
기본 파일을 앵귤러가 자동으로 생성해준다.
일단 기본파일에 ko를 붙여서 한글 파일을 만들어보자.
이걸 열어보면
messages.ko.xlf
<?xml version="1.0" encoding="UTF-8" ?>
<xliff version="1.2" xmlns="urn:oasis:names:tc:xliff:document:1.2">
  <file source-language="en" datatype="plaintext" original="ng2.template">
    <body>
      <trans-unit id="1e9a15da9ecb3574be8b466c285ed4aca1d89e4b" datatype="html">
        <source>
    Welcome to <x id="INTERPOLATION" equiv-text=""/>!
  </source>
  <target>
    환영합니다 <x id="INTERPOLATION" equiv-text=""/>!
  </target>
        <context-group purpose="location">
          <context context-type="sourcefile">app/app.component.html</context>
          <context context-type="linenumber">3</context>
        </context-group>
      </trans-unit>
      <trans-unit id="54f29f9a6da150fc7c4fcd0b7e6d9a1b0314fd35" datatype="html">
        <source>Here are some links to help you start: </source>
        <target>당신이 시작하는데 도움이 될 만한 링크입니다. </target>
        <context-group purpose="location">
          <context context-type="sourcefile">app/app.component.html</context>
          <context context-type="linenumber">8</context>
        </context-group>
      </trans-unit>
      <trans-unit id="170b2bb80cfeeaf71c71cd4b56d240fdda4dfc0b" datatype="html">
        <source>Tour of Heroes</source>
        <target>영웅 여행</target>
        <context-group purpose="location">
          <context context-type="sourcefile">app/app.component.html</context>
          <context context-type="linenumber">12</context>
        </context-group>
      </trans-unit>
      <trans-unit id="4446b939821a1c94d99d8f88ebf5c67844d48d08" datatype="html">
        <source>CLI Documentation</source>
        <target>CLI 문서들</target>
        <context-group purpose="location">
          <context context-type="sourcefile">app/app.component.html</context>
          <context context-type="linenumber">17</context>
        </context-group>
      </trans-unit>
      <trans-unit id="f7b003c76057ba9ff6d99232971f826d015eaf54" datatype="html">
        <source>Angular blog</source>
        <target>앵귤러 블로그</target>
        <context-group purpose="location">
          <context context-type="sourcefile">app/app.component.html</context>
          <context context-type="linenumber">22</context>
        </context-group>
      </trans-unit>
    </body>
  </file>
</xliff>
ssr 없이 한글 확인
angular.json 수정
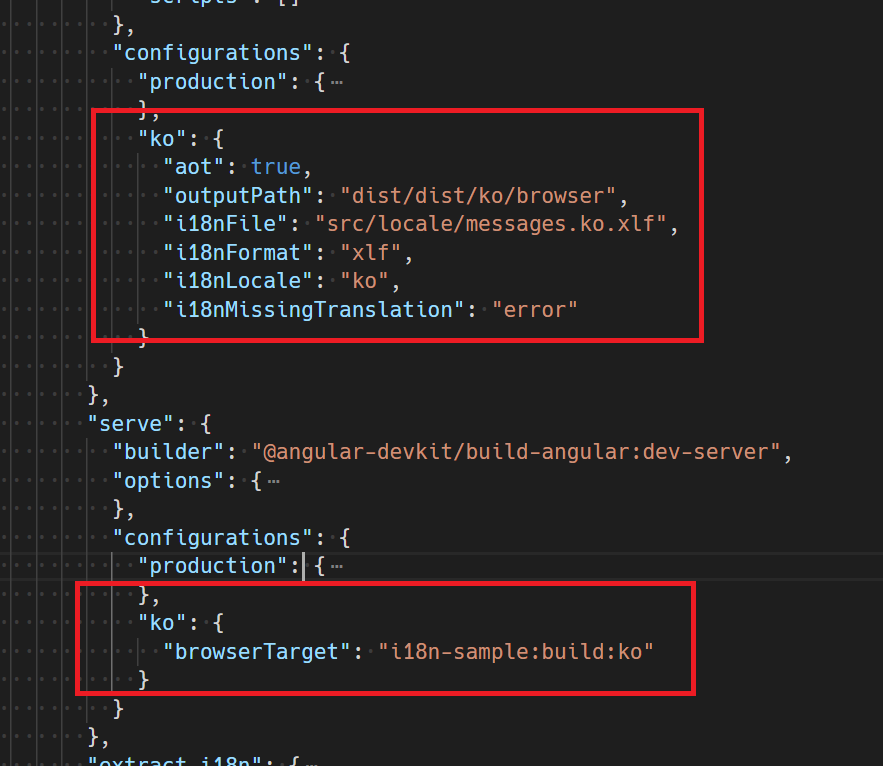
build 와 serve에 추가한다.
package.json에 다음 추가
"start:ko": "ng serve --configuration=ko",
실행
npm run start:ko
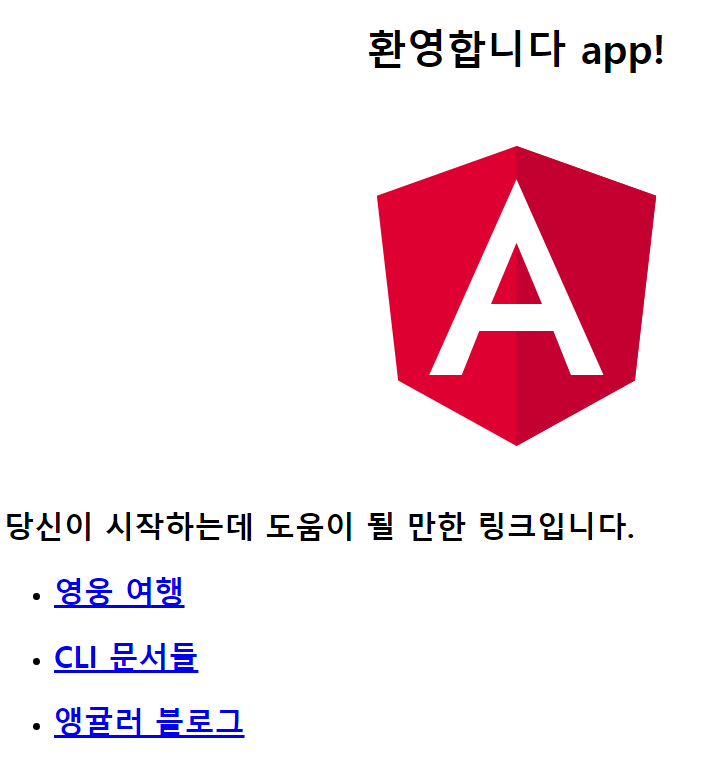
http://localhost:4200/ 해보면 한글로 바귀어 나온다.

i18n은 잘된것을 알수 있다. 이제 다른언어들도 다 변환하여 package.json에 추가하면 될 것이다.
SSR 로 빌드해서 실서버에서 테스트해보자.
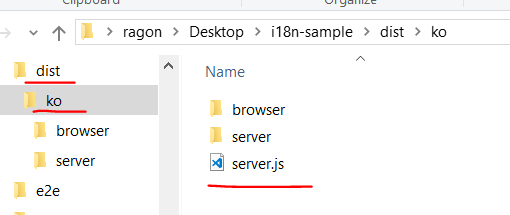
빌드된 아웃풋 경로를 기존에 dist/server에서 dist/ko/server로 바꾸려고 한다.
webpack.server.config.js수정
const path = require("path");
const webpack = require("webpack");

module.exports = env => { //여기 수정
  let langWithDash = env == undefined ? "" : "-" + env.lang; //추가
  let langWithSlash = env == undefined ? "" : "/" + env.lang; //추가
  return {
    entry: { server: "./server" + langWithDash + ".ts" },
    resolve: { extensions: [".js", ".ts"] },
    target: "node",
    mode: "none",
    // this makes sure we include node_modules and other 3rd party libraries
    externals: [/node_modules/],
    output: {
      path: path.join(__dirname, "dist" + langWithSlash),
      filename: "[name].js"
    },
    module: {
      rules: [{ test: /\.ts$/, loader: "ts-loader" }]
    },
    plugins: [
      // Temporary Fix for issue: https://github.com/angular/angular/issues/11580
      // for 'WARNING Critical dependency: the request of a dependency is an expression'
      new webpack.ContextReplacementPlugin(
        /(.+)?angular(\\|\/)core(.+)?/,
        path.join(__dirname, "src"), // location of your src
        {} // a map of your routes
      ),
      new webpack.ContextReplacementPlugin(/(.+)?express(\\|\/)(.+)?/, path.join(__dirname, "src"), {})
    ]
  };
};
언어를 env로 받아서 server-언어.ts로 해서 빌드를 하려고 하는중
기존 server.ts를 복사해서 server-ko.ts를 만들자.
import "zone.js/dist/zone-node";
import "reflect-metadata";
import { enableProdMode } from "@angular/core";
import * as express from "express";
import { join } from "path";

enableProdMode();

const app = express();

const PORT = process.env.PORT || 4000;
const DIST_FOLDER = join(process.cwd(), "");

const { AppServerModuleNgFactory, LAZY_MODULE_MAP } = require("./dist/ko/server/main"); //여기 수정

import { ngExpressEngine } from "@nguniversal/express-engine";
import { provideModuleMap } from "@nguniversal/module-map-ngfactory-loader";

app.engine(
  "html",
  ngExpressEngine({
    bootstrap: AppServerModuleNgFactory,
    providers: [provideModuleMap(LAZY_MODULE_MAP)]
  })
);
//이부분 추가 - 아래 설명
app.use(function(req, res, next) {
  if (req.url.slice(0, 4) === "/ko/") {
    req.url = req.url.slice(3);
  }
  next();
});

app.set("view engine", "html");
app.set("views", join(DIST_FOLDER, "browser"));

// Server static files from /browser
app.get("*.*", express.static(join(DIST_FOLDER, "browser")));

// All regular routes use the Universal engine
app.get("*", (req, res) => {
  console.log(`GET: ${req.originalUrl}`);
  res.render("index", {
    req: req,
    res: res
  });
});

// Start up the Node server
app.listen(PORT, () => {
  console.log(`Node server listening on http://localhost:${PORT}`);
});
위쪽에 읽어들어올 파일 경로 에 ko를 추가하였고 아래쪽에서 /ko/로 들어오는 트래픽에서 /ko 를 잘라내고 /로 바꿔서 다음으로 보낸다. 왜냐면 앱은 /로 들어올줄알고 있기 때문이다.
package.json 에 추가하자.
"build:ssr-ko": "npm run build:client-and-server-bundles-ko && npm run webpack:server-ko",
"build:client-and-server-bundles-ko": "ng build --prod --base-href=/ko --deploy-url=/ko/ --output-path=dist/ko/browser --i18n-file=src/locale/messages.ko.xlf --i18n-locale=ko --i18n-format=xlf  && ng run i18n-sample:server --outputPath=dist/ko/server",
"webpack:server-ko": "webpack --config webpack.server.config.js --env.lang=ko --progress --colors",
설명을 하면 빌드시 –base-href를 줘서 /ko가 기본경로가 되게 햇고 deploy-url을 이용해서 파일들 경로를 바꿔준다. 현재 앵귤러 6.0.8에 이부분에 조금 에러가 있는듯 싶다. html은 /ko를 붙여주지 않아서 /assets 처럼 /로 파일이 구성되 있다 나중에 처리할것이다.
빌드해보자.
npm run build:ssr-ko
결과는 다음과 같다.
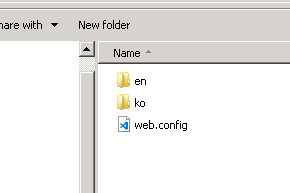
이제 dist아래 폴더를 서버에 올려보자.
서버에서 web.config를 다음처럼 수정한다.
<rule name="All Traffic" stopProcessing="true">
  <match url=".*" />
  <action type="Rewrite" url="ko/server.js" /> //ko를 붙여줌
</rule>
접속해보면 한글로 나오는것을 알수 있다.
한글 영어 동시 지원.
그럼 한글과 영어를 동시에 지원하려면 어떻게 해야할까?
빌드를 영어로 한번 한국어로 한번해서 같이 서버에 올리면될듯 싶다.
해보자.
언어파일 추가
messages.ko.xlf => messages.en.xlf
target을 영어로 만든다.
server-en.ts를 만들자 기존걸 복사
필요한 부분을 수정해준다. ko 를 en으로 해주면됩니다.
...
const { AppServerModuleNgFactory, LAZY_MODULE_MAP } = require("./dist/en/server/main"); //여기 수정

app.use(function(req, res, next) {
  if (req.url.slice(0, 4) === "/en/") { //여기 수정
    req.url = req.url.slice(3);
  }
  next();
});
...
package.json에 추가하자.
"build:ssr-en": "npm run build:client-and-server-bundles-en && npm run webpack:server-en",
"build:client-and-server-bundles-en": "ng build --prod --base-href=/en --deploy-url=/en/ --output-path=dist/en/browser --i18n-file=src/locale/messages.en.xlf --i18n-locale=en --i18n-format=xlf  && ng run i18n-sample:server --outputPath=dist/en/server",
"webpack:server-en": "webpack --config webpack.server.config.js --env.lang=en --progress --colors",
빌드해보자.
npm run build:ssr-ko npm run build:ssr-en
서버에 파일을 올리고 web.config를 수정한다. 기존 룰을 지우고 다음처럼 한다.
<rule name="Lang-EN" stopProcessing="true">
    <match url="^en[\/].*?" />
    <action type="Rewrite" url="en/server.js" />
</rule>

<rule name="L51ang-KO" stopProcessing="true">
    <match url="^ko[\/].*" />
    <action type="Rewrite" url="ko/server.js" />
</rule>
이제 웹브라우저로 접속해본다.
http://test.com/en/ http://test.com/ko/
한글 영어가 다 잘보인다.
이제 /로 접속시 고객의 언어에 따라서 각 페이지로 보내보자.
web.config를 다음을 추가한다.
<rule name="Redirect To KO"  stopProcessing="true">
  <match url="^$" />
    <conditions>
      <add input="{HTTP_ACCEPT_LANGUAGE}" pattern="^ko" />
  </conditions>
  <action type="Redirect" url="{R:0}/ko/home" appendQueryString="true" />
</rule>

<rule name="Redirect To EN"  stopProcessing="true">
  <match url="^$" />
    <conditions>
      <add input="{HTTP_ACCEPT_LANGUAGE}" pattern="^en" />
  </conditions>
  <action type="Redirect" url="{R:0}/en/home" appendQueryString="true" />
</rule>

<rule name="Root Hit Redirect" stopProcessing="true">
    <match url="^$" />
    <action type="Redirect" url="/en/home" />
</rule>
브라우저 언어가 한글이면 /ko로 영어면 /en으로 둘다 아닌 다른거는 전부 /en으로
/assets 문제
앵귤러 에러로 자꾸 /assets로 리퀘스트가 온다. 주로 이미지 파일이다. 이것도 리다이렉트로 처리해야한다.
<rule name="Asset Redirect" stopProcessing="true">
  <match url="^assets\/.*" />
  <action type="Rewrite" url="dist/en/server.js" appendQueryString="true" />
</rule>
이러면 /assets로 온 리퀘스르를 en 으로 보내줘서 결과를 줄수가 있다.
추가처리
- http면 https로 보내기
- 대소문자 섞여잇으면 전부 소문자로 변경하기
- 400에러나 500에러가 나오면 /로 보내주기
이 내용은 깃허브에 올라가잇는 소스코드를 참고하기 바란다 전체 web.config는 다음과 같다.
<configuration>
  <system.webServer>
    <httpErrors errorMode="Custom" defaultResponseMode="Redirect">
      <remove statusCode="404" />
      <remove statusCode="500" />
      <error statusCode="404" path="/en/home" responseMode="Redirect" />
      <error statusCode="500" path="/en/home" responseMode="Redirect" />
    </httpErrors>

    <!-- indicates that the hello.js file is a node.js application
    to be handled by the iisnode module -->
    <handlers>
      <!-- indicates that the app.js file is a node.js application to be handled by the iisnode module -->
      <add name="iisnode" path="server.js" verb="*" modules="iisnode" />
    </handlers>
    <rewrite>
      <rules>
        <!-- Don't interfere with requests for node-inspector debugging -->
        <rule name="NodeInspector" patternSyntax="ECMAScript" stopProcessing="true">
            <match url="^server.js\/debug[\/]?" />
        </rule>

        <rule name="Redirect to HTTPS" stopProcessing="true">
          <match url="(.*)" />
          <conditions>
          <add input="{HTTPS}" pattern="^OFF$" />
          </conditions>
          <action type="Redirect" url="https://{HTTP_HOST}/{R:1}" redirectType="Permanent" appendQueryString="true" />
        </rule>

        <rule name="Convert to lower case" stopProcessing="true">
          <match url=".*[A-Z].*" ignoreCase="false" />
          <action type="Redirect" url="{ToLower:{R:0}}" redirectType="Permanent" />
        </rule>

        <rule name="Lang-EN" stopProcessing="true">
            <match url="^en[\/].*?" />
            <action type="Rewrite" url="dist/en/server.js" />
        </rule>

        <rule name="L51ang-KO" stopProcessing="true">
            <match url="^ko[\/].*" />
            <action type="Rewrite" url="dist/ko/server.js" />
        </rule>

        <rule name="Lang-JA" stopProcessing="true">
          <match url="^ja[\/].*" />
          <action type="Rewrite" url="dist/ja/server.js" />
        </rule>

        <rule name="Asset Redirect" stopProcessing="true">
          <match url="^assets\/.*" />
          <action type="Rewrite" url="dist/en/server.js" appendQueryString="true" />
        </rule>

        <rule name="Redirect To KO"  stopProcessing="true">
          <match url="^$" />
            <conditions>
              <add input="{HTTP_ACCEPT_LANGUAGE}" pattern="^ko" />
          </conditions>
          <action type="Redirect" url="{R:0}/ko/home" appendQueryString="true" />
        </rule>

        <rule name="Redirect To JA"  stopProcessing="true">
          <match url="^$" />
            <conditions>
              <add input="{HTTP_ACCEPT_LANGUAGE}" pattern="^ja" />
          </conditions>
          <action type="Redirect" url="{R:0}/ja/home" appendQueryString="true" />
        </rule>

        <rule name="Root Hit Redirect" stopProcessing="true">
            <match url="^$" />
            <action type="Redirect" url="/en/home" />
        </rule>

      </rules>
    </rewrite>
  </system.webServer>
</configuration>
개선해야할 곳
- 언어 추가시마다 server.ts를 복사해서 경로를 변경해줘야하는데 조금 나은 방법이 있지 않을가?
- 한글로 보인다고 하더라도 소스보기를 하면 영어로 나온다. seo에는 좋지 않다.
소스코드
https://github.com/teamsmiley/i18n-sample
추가 사항
페이지에서 언어를 선택할수 있게 하기
결과는 다음과 같다.
app.components.ts
import { Component, LOCALE_ID, Inject, OnInit } from "@angular/core";

@Component({
  selector: "app-root",
  templateUrl: "./app.component.html",
  styleUrls: ["./app.component.css"]
})
export class AppComponent {
  title = "app";

  currentLanguageCode: string = "en";

  languages = [
    { code: "en", label: "English", seleted: false },
    { code: "ko", label: "한국어", seleted: false },
    { code: "ja", label: "日本語", seleted: false }
  ];

  constructor(@Inject(LOCALE_ID) public localeId: string) {}

  ngOnInit() {
    if (this.localeId == "ko") this.currentLanguageCode = "ko";
    else if (this.localeId == "ja") this.currentLanguageCode = "ja";
  }
}
app.component.html
<div class="mr-md-3">
  <select name="select" class="btn btn-outline-warning btn-sm" onchange="window.open(value,'_self');">
    <option *ngFor="let language of languages" value="//home" [selected]="language.code==currentLanguageCode"></option>
  </select>
</div>
npm run build:ssr-ko npm run build:ssr-en