angular 6 SSR
download sample file
https://angular.io/guide/universal 여기에서 Download the finished sample code 를 클릭하여 다운받는다. https://angular.io/generated/zips/universal/universal.zip
package.json update
cd C:\Users<your-id>\Desktop\universal
code .
package.json을 열어서 rc가 붙은건 다 지운다.
angular cli 6.0으로 샘플 프로젝트를 만들어서 거기에 있는 package.json하고 버전을 같게 만든다.
업데이트후 코드
{
  "name": "angular-io-example",
  "version": "1.0.0",
  "private": true,
  "description": "Example project from an angular.io guide.",
  "scripts": {
    "ng": "ng",
    "build": "ng build --prod",
    "start": "ng serve",
    "test": "ng test",
    "lint": "tslint ./src/**/*.ts -t verbose",
    "e2e": "ng e2e",
    "start:fr": "ng serve --aot --i18nFile=src/locale/messages.fr.xlf --i18nFormat=xlf --locale=fr",
    "build:fr": "ng build --prod --i18nFile=src/locale/messages.fr.xlf --i18nFormat=xlf --locale=fr",
    "extract": "ng xi18n --outputPath=src/locale",
    "build:ssr": "npm run build:client-and-server-bundles && npm run webpack:server",
    "serve:ssr": "node dist/server.js",
    "build:client-and-server-bundles": "ng build --prod && ng run angular.io-example:server",
    "webpack:server": "webpack --config webpack.server.config.js --progress --colors"
  },
  "keywords": [],
  "author": "",
  "license": "MIT",
  "dependencies": {
    "@angular/animations": "^6.0.0",
    "@angular/common": "^6.0.0",
    "@angular/compiler": "^6.0.0",
    "@angular/core": "^6.0.0",
    "@angular/forms": "^6.0.0",
    "@angular/http": "^6.0.0",
    "@angular/platform-browser": "^6.0.0",
    "@angular/platform-browser-dynamic": "^6.0.0",
    "@angular/router": "^6.0.0",
    "core-js": "^2.5.4",
    "rxjs": "^6.1.0",
    "zone.js": "^0.8.26",
    //ssr project added
    "@angular/upgrade": "^6.0.0",
    "angular-in-memory-web-api": "^0.6.0",
    "@nguniversal/express-engine": "6.0.0",
    "@nguniversal/module-map-ngfactory-loader": "6.0.0"
  },
  "devDependencies": {
    "@angular/compiler-cli": "^6.0.0",
    "@angular-devkit/build-angular": "~0.6.0",
    "@angular/cli": "~6.0.0",
    "@angular/language-service": "^6.0.0",
    "@types/jasmine": "~2.8.6",
    "@types/jasminewd2": "~2.0.3",
    "@types/node": "~8.9.4",
    "codelyzer": "~4.2.1",
    "jasmine-core": "~2.99.1",
    "jasmine-spec-reporter": "~4.2.1",
    "karma": "~1.7.1",
    "karma-chrome-launcher": "~2.2.0",
    "karma-coverage-istanbul-reporter": "~1.4.2",
    "karma-jasmine": "~1.1.1",
    "karma-jasmine-html-reporter": "^0.2.2",
    "protractor": "~5.3.0",
    "ts-node": "~5.0.1",
    "tslint": "~5.9.1",
    "typescript": "~2.7.2",
    //ssr project added
    "@angular/platform-server": "^6.0.0",
    "ts-loader": "^4.2.0",
    "webpack-cli": "^2.0.14",
    "karma-phantomjs-launcher": "^1.0.2",
    "lodash": "^4.16.2",
    "phantomjs-prebuilt": "^2.1.7"
  },
  "repository": {}
}
패키지 설치
npm i
빌드
- ssr이 적용된채로 빌드 : npm run build:ssr
실행
- ssr이 적용이 안된채로 실행 : npm start
- ssr 적용된채 실행 : npm run serve:ssr
environment를 추가
staging에서 접속해야할 apiurl이 test.api.com이고 prod에서는 api.com이라고 하면 각자 다른값을 적용해야한다. 빌드에 따라서 이것이 바뀌게 해보자.
src/environments environment.staging.ts으로 새파일을 만든다.
environment.staging.ts
export const environment = {
    production: true
  };
이제 prod도 있고 staging도 있다. apiurl을 추가해보자.
- environment.ts
export const environment = {
  production: false,
  apiUrl: 'localhost.api.sample.com'
};
- staging
export const environment = {
  production: true,
  apiUrl: 'staging.api.sample.com'
};
- prod
export const environment = {
  production: true,
  apiUrl: 'api.sample.com'
};
app.component 수정해서 화면에서 확인가능하게 하자.
app.component.ts
import { Component } from '@angular/core';
import { environment } from '../environments/environment';

@Component({
  selector: 'app-root',
  templateUrl: './app.component.html',
  styleUrls: ['./app.component.css']
})
export class AppComponent {
  title = 'Tour of Heroes';
  apiUrl = environment.apiUrl;
}
app.component.html
<h1>{ { apiUrl } }</h1>
실행을 해보고 화면에 찍히는지 확인
ng serve -o
localhost.api.sample.com 라고 찍히는것 확인
production browser build
package.json을 수정하자.
//"build:client-and-server-bundles": "ng build --prod && ng run angular.io-example:server",
"build:client-and-server-bundles": "ng build --prod  --configuration=production && ng run angular.io-example:server",
npm run build:client-and-server-bundles
/dist/browser/main.js를 확인해보자.
this.apiUrl=”api.sample.com”를 확인할수 있다.
그런데 /dist/server/main.js는 여전히 apiUrl: ‘localhost.api.sample.com’ 이다
production server build
package.json에서 다음을 수정한다.
//"build:client-and-server-bundles": "ng build --prod --configuration=production && ng run angular.io-example:server",
"build:client-and-server-bundles": "ng build --prod --configuration=production && ng run angular.io-example:server:production",
ng run angular.io-example:server:production 이부분이 바뀌었음
ng run은 다음과 같다.
ng run
그래서 angular.io-example는 프로젝트명 타켓은 서버 그다음에 configuration 넣어준다.
angular.json 을 보면 없다. builder하고 option만 있다.
"server": {
    "builder": "@angular-devkit/build-angular:server",
    "options": {
        "outputPath": "dist/server",
        "main": "src/main.server.ts",
        "tsConfig": "src/tsconfig.server.json"
    }
}
configuration을 추가해준다. 변경해보자.
"server": {
    "builder": "@angular-devkit/build-angular:server",
    "options": {
        "outputPath": "dist/server",
        "main": "src/main.server.ts",
        "tsConfig": "src/tsconfig.server.json"
    },
    "configurations":{
        "production": {
            "fileReplacements": [
            {
                "replace": "src/environments/environment.ts",
                "with": "src/environments/environment.prod.ts"
            }
            ]
        }
    }
}
파일을 열어보면 fileReplacements를 이용해서 environment를 교체해주는 것이다.
package.json에서 build부분을 초기 환경과 prod환경 둘다 되게 해주자.
"build:client-and-server-bundles": "ng build --prod && ng run angular.io-example:server  --i18n-file=src/locale/messages.en.xlf --i18n-locale=en --i18n-format=xlf",

"build:client-and-server-bundles-prod": "ng build --prod --configuration=production && ng run angular.io-example:server:production  --i18n-file=src/locale/messages.en.xlf --i18n-locale=en --i18n-format=xlf",
staging 추가
package.json에서 추가
"build:client-and-server-bundles-staging": "ng build --prod --configuration=staging && ng run angular.io-example:server:staging --i18n-file=src/locale/messages.en.xlf --i18n-locale=en --i18n-format=xlf",
angular.json에서 build configuration 추가
"configurations": {
    "production": {
        "optimization": true,
        "outputHashing": "all",
        "sourceMap": false,
        "extractCss": true,
        "namedChunks": false,
        "aot": true,
        "extractLicenses": true,
        "vendorChunk": false,
        "buildOptimizer": true,
        "fileReplacements": [
        {
            "replace": "src/environments/environment.ts",
            "with": "src/environments/environment.prod.ts"
        }
        ]
    },
    "staging": {
        "optimization": true,
        "outputHashing": "all",
        "sourceMap": false,
        "extractCss": true,
        "namedChunks": false,
        "aot": true,
        "extractLicenses": true,
        "vendorChunk": false,
        "buildOptimizer": true,
        "fileReplacements": [
        {
            "replace": "src/environments/environment.ts",
            "with": "src/environments/environment.staging.ts"
        }
        ]
    }
angular.json에서 server configuration 추가
"server": {
  "builder": "@angular-devkit/build-angular:server",
  "options": {
    "outputPath": "dist/server",
    "main": "src/main.server.ts",
    "tsConfig": "src/tsconfig.server.json"
  },
  "configurations":{
    "production": {
      "fileReplacements": [
        {
          "replace": "src/environments/environment.ts",
          "with": "src/environments/environment.prod.ts"
        }
      ]
    },
    "staging": {
      "fileReplacements": [
        {
          "replace": "src/environments/environment.ts",
          "with": "src/environments/environment.staging.ts"
        }
      ]
    }
  }
}
npm run build:client-and-server-bundles-staging 를 하면 빌드가 되고 main.js에 잘 적용이 된다.
webpack을 적용하자.
    "build:ssr": "npm run build:client-and-server-bundles && npm run webpack:server",
    "build:ssr-prod": "npm run build:client-and-server-bundles-prod && npm run webpack:server", //추가
    "build:ssr-staging": "npm run build:client-and-server-bundles-staging && npm run webpack:server",//추가
npm run build:ssr-prod
npm run build:ssr-staging
이러면 된다.
이제 프로덕션 빌드를 iis 서버에 배포해보자.
참고 : https://www.youtube.com/watch?v=JUYCDnqR8p0
iis를 설치한다.(7.5를 기준으로함. windows 2008 r2)
iis node를 설치한다. https://github.com/tjanczuk/iisnode
redirect 모듈도 설치한다. rewrite_2.0_rtw_x64.msi
iis에서 사이트를 만든후 디렉토리를 만든다.
server.ts를 다음처럼 변경한다.
// const DIST_FOLDER = join(process.cwd(), 'dist');
const DIST_FOLDER = join(process.cwd(), '');
빌드한다.
npm run build:ssr-prod
/dist 폴더에 잇는 모든 파일을 복사를 해서 실서버의 디렉토리에 복사한다.
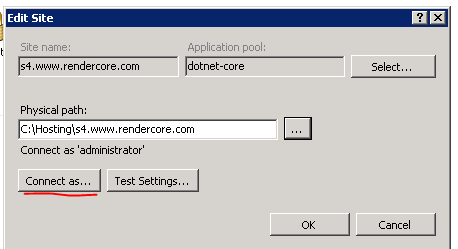
403 에러 발생시 디렉토리 연결 권한을 administrator로 준다.
web.config도 설정해준다.
<configuration>
  <system.webServer>

    <!-- indicates that the hello.js file is a node.js application
    to be handled by the iisnode module -->

           <handlers>
            <!-- indicates that the app.js file is a node.js application to be handled by the iisnode module -->
            <add name="iisnode" path="server.js" verb="*" modules="iisnode" />
        </handlers>


        <rewrite>
            <rules>
                <!-- Don't interfere with requests for node-inspector debugging -->
                <rule name="NodeInspector" patternSyntax="ECMAScript" stopProcessing="true">
                    <match url="^server.js\/debug[\/]?" />
                </rule>

                <!-- First we consider whether the incoming URL matches a physical file in the /public folder -->
                <rule name="StaticContent">
                    <action type="Rewrite" url="public{REQUEST_URI}" />
                </rule>

                <!-- All other URLs are mapped to the Node.js application entry point -->
                <rule name="DynamicContent">
                    <conditions>
                        <add input="{REQUEST_FILENAME}" matchType="IsFile" negate="True" />
                    </conditions>
                    <action type="Rewrite" url="server.js" />
                </rule>
            </rules>
        </rewrite>

  </system.webServer>
</configuration>
실제 사이트에서 접속 확인해본다.